
Tables of Contents 1. Overview 2. Planning Steps 3. Getting Started 4. Using Cirrus Account Linking...
Table of Contents
1. Overview
4. Email Configuration: Email Address Handling
5. Email Configuration: Invitation Message Setup
Overview
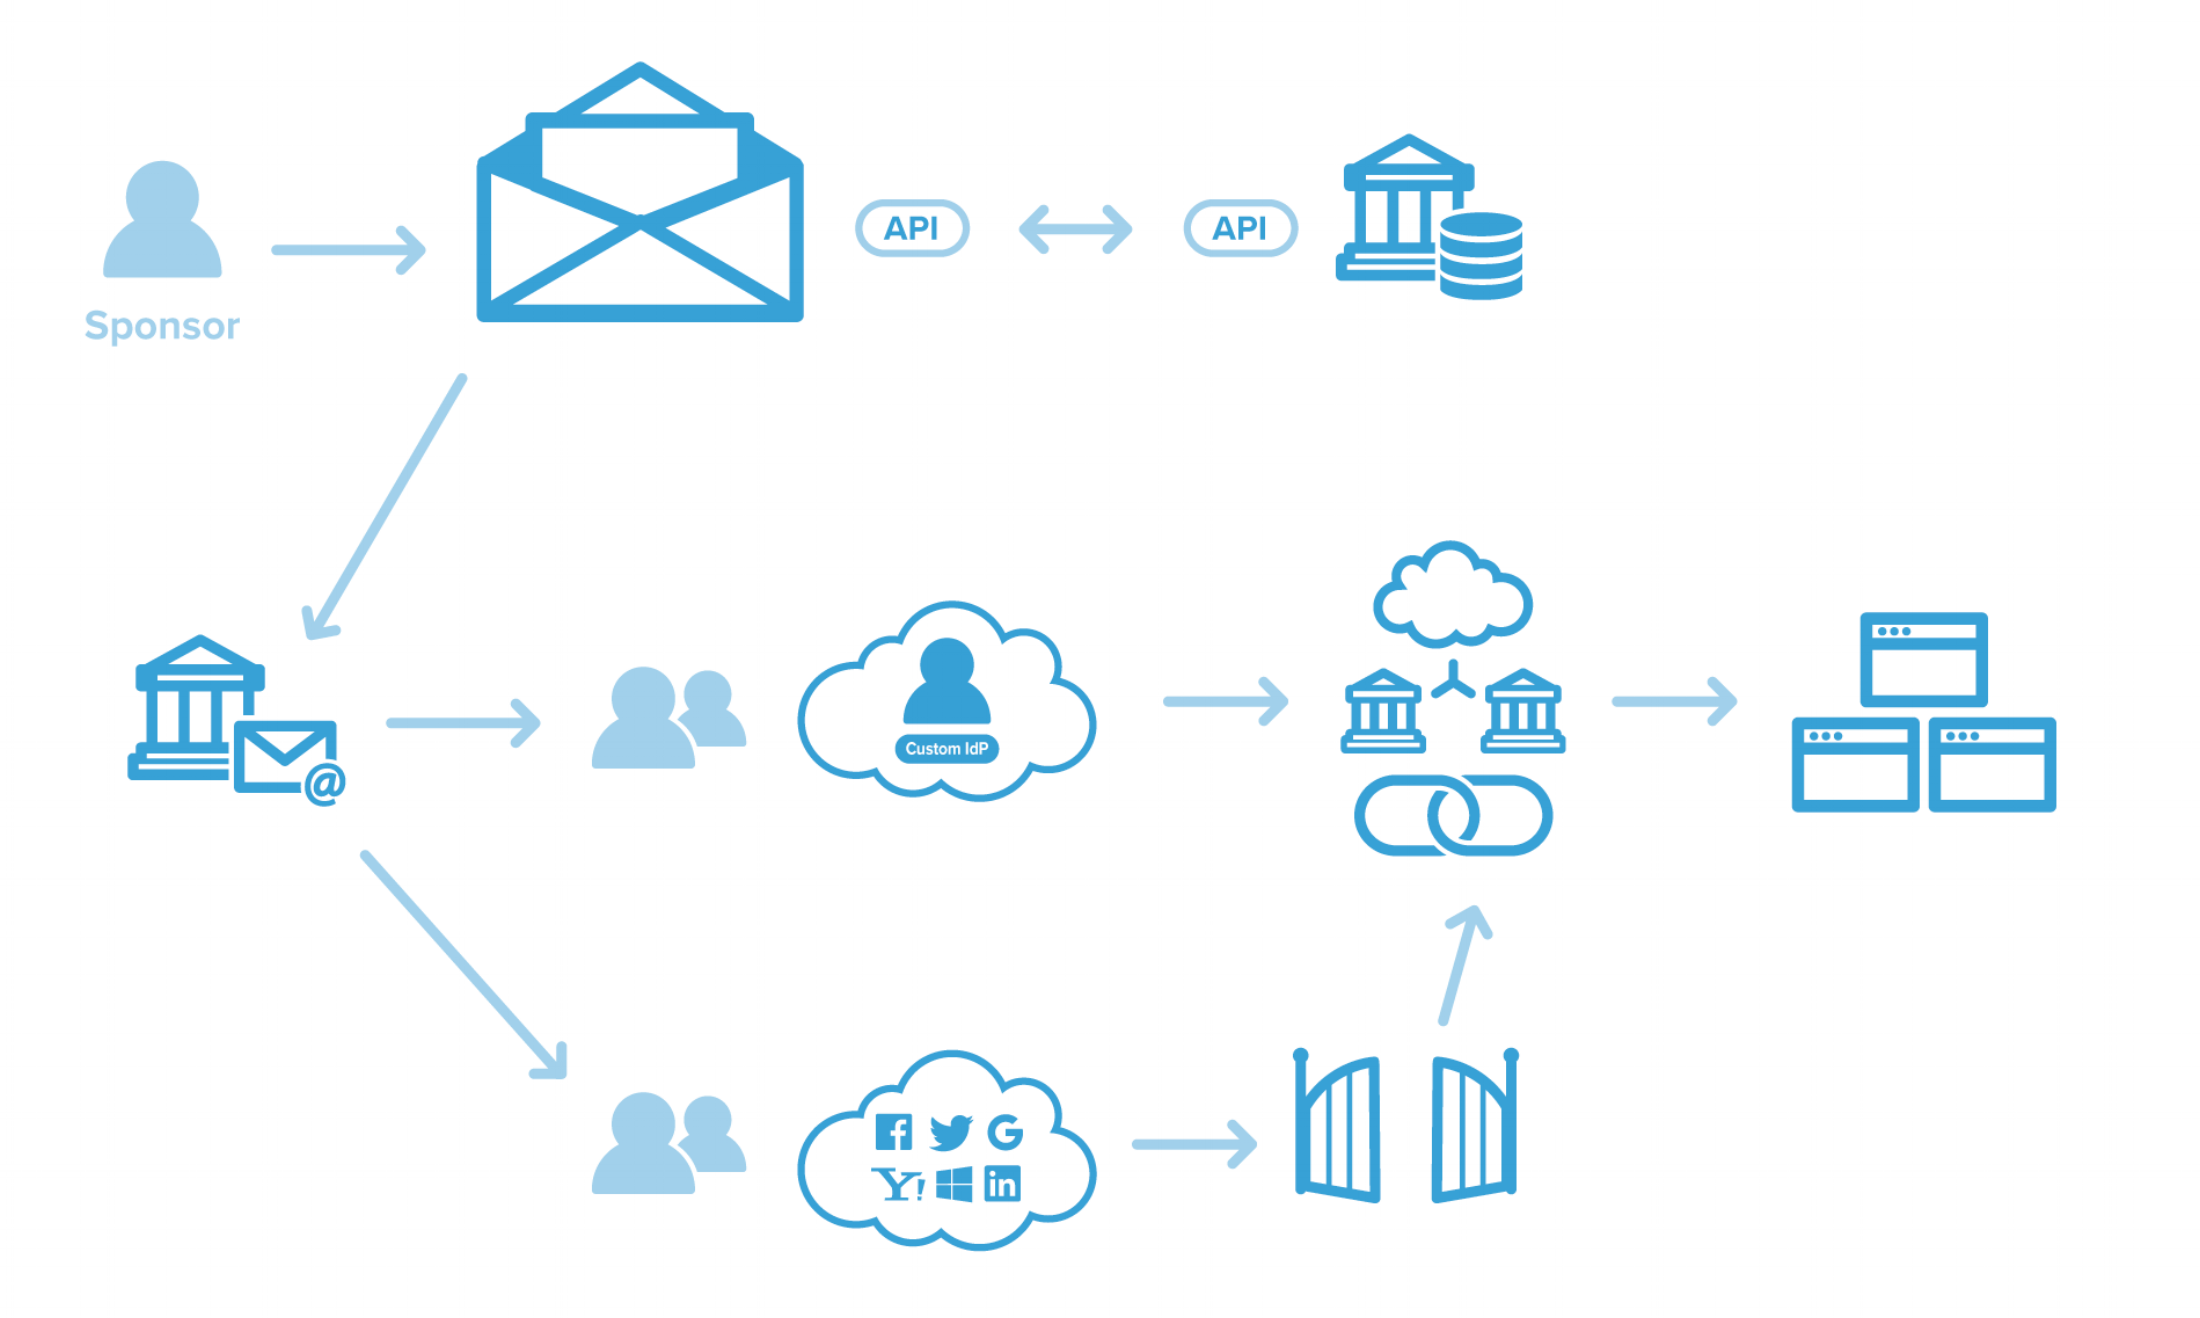
Many organizations with to limit the use of external or guest access only to users who have been explicitly "sponsored" by enterprise account holders. Sponsored accounts can address accountability and other compliance concerns. Most times, this functionality ends up being a customization to existing administrative or identity management solutions that must be maintained by the organization over time.
Cirrus Invitation provides a solution to manage sponsorship of external access without the need to maintain the underlying systems. Invitation provides a lightweight workflow that allows sponsors to "invite" specific end users (designated as guests) and on board them to an external login method using an email invitation. The external login methods supported are:
- Social Login Providers such as Google, Facebook, Microsoft, LinkedIn, and others supported by the Cirrus Gateway
- A customer affiliated guest account provided by the Cirrus External Identity Provider
- The Cirrus Identity hosted EduAccessID service
- An account from a federated identity provider:
- From an identity provider published in a public trust federation such as InCommon or one of the eduGAIN federations
- From an identity provider published in a non-eduGAIN federation (metadata would have to be exchanged directly with Cirrus Identity Support)
- From an unpublished identity provider where the metadata is directly exchanged with Cirrus Identity Support
Cirrus Invitation is based on a few principles:
- Sponsors are affiliated with the organization
- End users use external accounts that are appropriate for the services being accessed -- in most cases the accounts already exist but depending on the allowed login methods, a new account may need to be created
- For most deployment patterns, sponsors can be authenticated with the organization’s enterprise identity provider (the exception would be if invitations are being generated using Cirrus APIs)
- Sponsorship is a form of course grained access control (authorization) -- the lack of a sponsor prevents access to one or more service provide
Planning Steps
Step 1 - Identify the implementation pattern
The first planning step is to identify the Cirrus Invitation implementation pattern to use. There are three generally accepted patterns:
-
Gateway Pattern: The simplest pattern is to invite individual end users to access a single Service Provider using the Cirrus Gateway social login providers (Google, Facebook, Microsoft, LinkedIn, or others).
-
Proxy Pattern: The most common pattern is to invite individual end users to access a Cirrus Identity Provider Proxy. This pattern addresses several use cases:
-
Use of the Proxy removes the constraint of a service provider needing to support multi-lateral SAML federation and enables a broader selection of Service Providers to leverage the Invitation solution
-
Many times, the target audience for Invitation needs to access a collection of service providers -- using Proxy ensures all of the Service Providers receive the same information about the individual
-
This pattern also supports enforcement of invitations claimed using non-social identity providers such as the Cirrus External Identity Provider and other federated Identity Providers
-
-
Linking Pattern: A more advanced pattern is to invite individual end users and to also use Cirrus Account Linking to attach one or more organizational identifiers to the invitation. The value of this pattern is to combine the access control characteristics that sponsorship brings with the access life cycle characteristics that are made possible with stable, organization controlled identifiers.
The following table summarizes the three patterns:
| Pattern | "Gateway Pattern" | "Proxy Pattern" | "Linking Pattern" |
|---|---|---|---|
| Required Modules |
Cirrus Invitation Cirrus Gateway |
Cirrus Invitation Cirrus Gateway Cirrus Identity Provider Proxy Cirrus External IdP (if used) |
Cirrus Invitation Cirrus Gateway Cirrus Identity Provider Proxy Cirrus Account Linking Cirrus External IdP (if used) |
| Supported IdPs |
Social Providers | Social Providers Cirrus External IdP Federation IdPs |
Social Providers Cirrus External IdP Federation IdPs |
| Invitation Enforced |
At Gateway | At Proxy | At Proxy |
| Can Support Multiple SPs |
No | Yes | Yes |
| Can Assert Organziation Data |
No | No | Yes |
A special implementation pattern is self-sponsorship using the Cirrus Self-Registration add-on. This is a separate add-on to Invitation and is discussed here.
Step 2 - Determining how sponsors will send invitations
The next planning step is to figure out the process sponsors will use to send the invitations. The integration patterns discussed in Step 1 support three methods for creating the invitation. The first two methods leverage a web based user interface to either send invitations in small numbers (up to about ten) or to upload a comma-delimited file (CSV) to send the invitations.
Sponsors can be authorized to access this interface in the following ways:
-
Authorize specific eduPersonAffiliation values for sending invitations
-
Authorize by eduPersonEntitlement for sending invitations
-
Authorize specific SP or Org Console administrators for sending invitations
The web interface for the sponsor looks as follows:
The third option for sending invitations is to use Cirrus APIs to create the invitations. The APIs support creating individual invitations or processing batches contained in a comma-delimited file (CSV). The API option is useful when the sponsor interaction will be taking place in another system (for example a student requesting access for a parent from within the student administration system).
API documentation is available to subscribing customers in the Cirrus Support Center.
Step 3 - Consider Messaging
The third planning step is to consider the messaging that will be used with both sponsors, and end users. The Invitation solution provides a basic workflow of email messages and online dialog to enable the claiming process. Where appropriate, Cirrus Identity has made these messages configurable by the customer with options to include dynamic content. Customers will want to consider the following as they configure messaging:
-
Is the messaging going to be specific to one service provider, a group of service providers, or generic for the whole organization?
-
Is the messaging going to be for a specific audience (for example applicants or alumni) or will it need to cover a broader audience of external access end users?
-
Will the message overlap with messaging for API based Cirrus Account Linking or the Cirrus Self-Registration feature?
-
How much detail should be provided in the messages? Is there an option to have simpler messages and provide a link to a central knowledge base or FAQ on the organization’s website?
To help with your planning, see “Invitation | Message Setup” for descriptions and available dynamic content options for each of the Invitation email and dialog messages.
Next you will want to look at Getting Started with Cirrus Invitation.
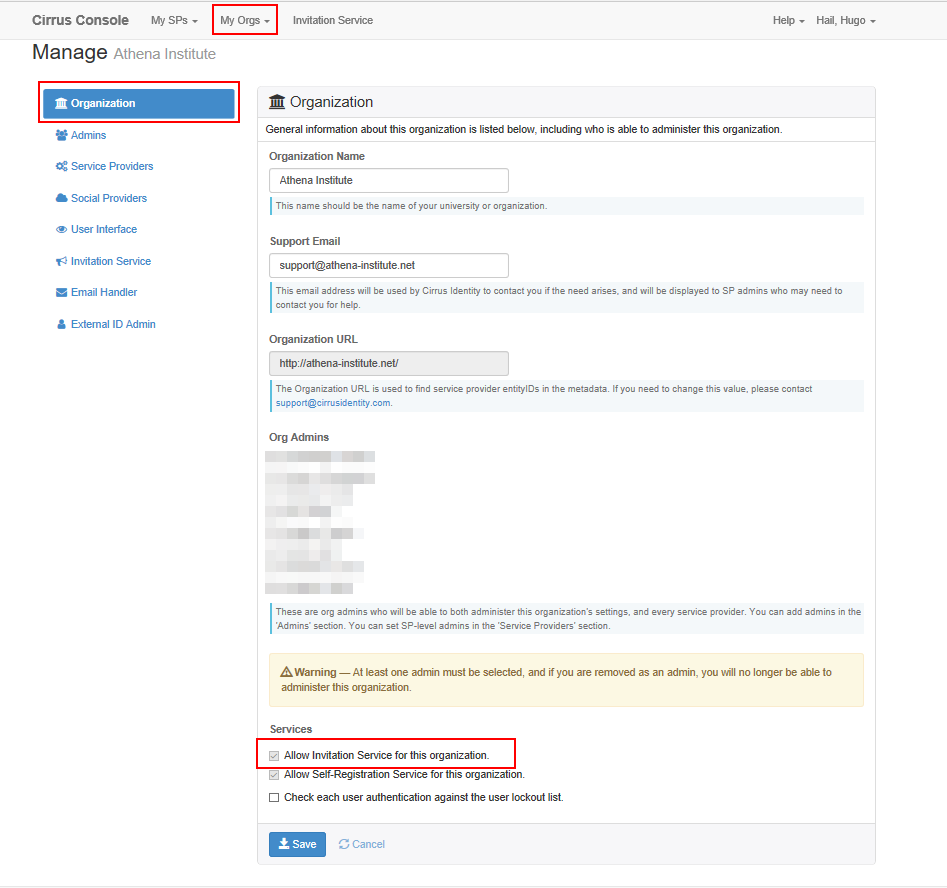
Customers subscribing to Cirrus Invitation will have the Invitation capability enabled for the customer’s organization. This is set by Cirrus Identity and customers should contact “support@cirrusidentity.com” if there is a belief it should be enabled. This can be verified by looking at the bottom of the “Organization” page on the “My Org” menu as follows:
Customers will often subscribe to one or more additional Cirrus Identity modules to support desired implementation patterns. In addition to enabling Invitation, Cirrus Identity Provider Proxy and Cirrus External Identity Provider instances may be provisioned, and some initial setup for Cirrus Gateway and/or Cirrus Account Linking may also take place.
The following are the steps needed to get started using Cirrus Invitation:
-
Customers should consider the planning steps before starting. If help is needed, Cirrus Identity offers generally accepted practices, customer stories, and professional services to help.
-
Depending on the target audience, Cirrus will provision other modules based on the customer’s subscription (or trial/PoC agreement). Modules such as Cirrus Gateway, Cirrus External Identity Provider, Cirrus Account Linking, and Cirrus External Identity Provider each have associated setup. See the “Getting Started” for each module as appropriate:
-
If there is an identity provider or service provider that is needed by Invitation, but the metadata for the SP/IdP is not published to federation metadata (for example InCommon or eduGAIN), the metadata needs to be sent to support@cirrusidentity.com for configuration.
-
A member of the organization needs to have access to the Cirrus Console and to be granted the “Organization Administrator” (org admin) role for your organization (see Cirrus Console Getting Started).
-
The SP (or the SP side of a Cirrus Proxy) will need to be active in the Cirrus Console and have the Invitation capability enabled. If it has not already been configured, an org admin will create the SP in the Console so it can be configured. While configuring the SP, the option to allow the SP to use Invitation needs to be enabled.
-
From the Cirrus Console, an org admin will configure the organization level Invitation settings found on the “My Orgs | Invitation Service” page:
-
Configure the email invitation validity period -- this can be overridden if Cirrus APIs are used to send invitations
-
Configure the duration of sponsorship -- this can be overridden if Cirrus APIs are used to send invitations
-
Configure the organization wide email subject line -- this can be overridden if Cirrus APIs are used to send invitation (See Message Setup for more detail)
-
Configure the organization wide invitation include -- generally accepted practice is to include the “INVITATION_LINK” here (See Message Setup for more detail)
-
Enable domain blocking to prevent the sending and/or claiming of invitations from any email address associated with the organization’s domain.
-
-
From the Cirrus Console, an org admin will configure the email settings found on the “My Orgs | Email Handler” page. By default, email sent from Invitation will be sent using Cirrus Identity mail infrastructure. Generally accepted practice is for customers to have email originate from the organization's email infrastructure. Customers control this capability from the “Email Handler” page.
-
From the Cirrus Console, an admin will configure the Cirrus Gateway to enable social login capabilities (see Cirrus Gateway Getting Started). Generally Invitation is used with social login options, however that is not a requirement and can be skipped if the Cirrus External Identity Provider and/or federated identity providers are the only ones be integrated.
-
From the Cirrus Console, an admin will configure the Cirrus Discovery Service to enable the end user to select the identity provider (social login, Cirrus External IdP, and/or federated identity providers) for login (see Cirrus Discovery Getting Started).
-
From the Cirrus Console, an admin will start the configuration by going to the “My SPs | Invitation Service” page for the desired SP and starting the configuration:
-
Make sure to “Enable Invitations” if invitations will be used to control access. Most Invitation use cases will want this enabled and only in specific Cirrus Account Linking cases should this be disabled.
-
Set basic attributes about the messages
-
Establish how sponsors will be authorized to create invitations
-
Define the required attributes
-
Define the content of messages (See Message Setup for more detail)
-
Set if non-social identity providers will be allowed -- this should be set if Cirrus External Identity Provider and/or federated identity providers will be allowed and should only be set if the SP is associated with a Cirrus Proxy
-
Set if sponsors will be allowed to upload a file of end users to invite
-
Set if expiration notices should go out individuals
-
-
Change the configuration of SPs to trust the proper IdP, utilize the Cirrus Proxy if appropriate, and utilize the Cirrus Discovery Service as outlined by:
Once these steps are complete, you are ready to use Invitation. Invitation can be tested using the Invitation Service webform from the Cirrus Console. That same form can be used by properly authorized sponsors (See 10.3).
To monitor invitations, the Invitation Service menu has a “My Guests” page to present each sponsor the guests they sponsor. Administrators can see all pending and claimed invitations from the “My SPs | Pending Invitations” and “My SPs | Guests” pages respectively.
Email Configuration: Email Address Handling
Objective
This solution describes how the email address is handled during the registration process of both the Cirrus Invitation Service and Cirrus Account Linking.
Background
Most configurations of both the Invitation and Account Linking products have a process flow as follows:
-
The user is sent an email with a registration URL based on a request from the Invitation or Account Linking product
-
The user clicks the registration URL or selects the URL and pastes it into a browser, and is taken to a Cirrus Identity page to accept the registration by logging in with a social identity provider
-
The social provider releases attributes about the user to Cirrus Identity as part of the authentication assertion
-
If needed, the user provides additional attributes that are not available from the social provider (see examples below)
-
Cirrus Identity completes the registration by connecting the email address to the original Invitation or Account Linking request
During this process, the address that is used to send the email with the registration URL and the address that gets connected to the completed request should be treated as mutually exclusive. The reasons for this vary depending on the following scenarios:
-
A user receives the email with the registration URL at a GMail address and registers it with Google as a social provider
-
A user receives the email with the registration URL at one address and registers it with a social provider associated with a different email address (for example the user receives the registration URL at their GMail address and logs in with Yahoo)
-
A user receives the email with the registration URL at one address and registers it with a social provider that has email address as an optional attribute (for example Facebook)
-
A user receives the email with the registration URL at one address and registers it with a social provider that does not release email as an attribute (for example Weibo)
Scenario #1
-
"Ted Thunder" receives an email with a registration URL at "ted.thunder@athena-institute.net" which is hosted by Google.
-
Ted clicks the registration URL and is taken to the Cirrus Identity registration user interface (which looks very similar to the Cirrus Discovery Service).
-
Ted picks "Google Login" and is taken through the standard Google authentication flow.
-
The registration process proceeds directly to completion and the resulting email address is "ted.thunder@athena-institute.net".
Scenario #2
-
"Ted Thunder" receives an email with a registration URL at "ted.thunder@athena-institute.net" which is hosted by Google.
-
Ted clicks the registration URL and is taken to the Cirrus Identity registration user interface (which looks very similar to the Cirrus Discovery Service).
-
Ted picks "Yahoo Login" and is taken through the Yahoo authentication flow.
-
Ted will then be taken to the Cirrus Identity registration interface. Because Yahoo does not release name, the user must provide them. The email address (“ted@yahoo.com”) is editable, but if changed a verification process is triggered.
-
When Ted completes the registration, the resulting email address is "ted@yahoo.com".
Scenario #3
-
"Ted Thunder" receives an email with a registration URL at "ted.thunder@athena-institute.net" which is hosted by Google.
-
Ted clicks the registration URL and is taken to the Cirrus Identity registration user interface (which looks very similar to the Cirrus Discovery Service).
-
Ted picks "Facebook Login" and is taken through the Facebook authentication flow.
-
Facebook will ask for release of attributes. If there is an email address available (for example “ted@gmail.com”), the registration process proceeds directly to completion and resulting email address is “ted@gmail.com”.
Scenario #4
-
"Ted Thunder" receives an email with a registration URL at "ted.thunder@athena-institute.net" which is hosted by Google.
-
Ted clicks the registration URL and is taken to the Cirrus Identity registration user interface (which looks very similar to the Cirrus Discovery Service).
-
Ted picks "Weibo Login" and is taken through the Weibo authentication flow.
-
Ted will then be taken to the Cirrus Identity registration interface. Because Weibo does not release email the user must provide one. The email address will default to the invited one (“ted.thunder@athena-institute.net”) but is editable. If it is changed, a verification process is triggered.
-
When Ted completes the registration, the resulting email address is “ted.thunder@athena-institute.net” (assuming he did not change it and go through the validation process).
Email Configuration: Invitation Message Setup
Messages
When configuring the Cirrus Invitation Service for a service provider, there are a number of configurable user interface dialog messages and email messages. Many of these can be further customized using substitution strings. The following table outlines the messages, the purpose for each, and the order of the message.
| Message | Description | Guest Workflow Step |
Invitation | API Acct Linking |
Self-Reg |
|---|---|---|---|---|---|
| Org level email subject line |
The default subject line for email messages send by Cirrus Invitation. When sending invitations or account linking requests via Cirrus APIs, the subject line can be changed. | X | X | ||
| Org level message to append to all outgoing invite/acct link request emails | A block of content that is appended to the bottom of all invite or account linking request emails. Generally accepted practice is to establish the “INVITATION_LINK” substitution variable and any minimal narrative here so that it is presented uniformly. | X | X | ||
| Sponsor Web Form (“Instructions for Sponsor”) | The instructions for sponsors when the the Cirrus Invitation web form is used. | X | |||
| Invite/Acct Link Request Email | The content of the email send to the end user’s email address. The message should include the request URL defined by the “INVITATION_LINK” substitution variable. This message will have content defined at the org level appended at the end. NOTE: There is a configuration option to allow the suppression of this message. This option should only be used after consulting with Cirrus Identity Support. |
1 | X | X | |
| Invite / Acct Link Request Claim UI (“Instructions for Guest”) | The instructions that will be displayed to the end user after clicking the URL contained in the Invitation or Account Linking request email. The end user will be asked to respond to a terms-of service and then be presented with login options to claim the request. Those login options will be a function of the Invitation configuration and the options set by Cirrus Discovery. | 2 | X | X | |
| Self-Reg UI (“Instructions for Guest”) | The instructions that will be displayed to the end user after clicking the self-registration URL. The end user will be asked to respond to a terms-of service and then be presented with login options to self-register. Those login options will be a function of the Self-Register configuration and the options set by Cirrus Discovery. | X | |||
| Terms of Service | Invitation, API based Account Linking, and Self-Registration all have a requirement for the end user to agree to terms-of-service (ToS) before selecting a method of login. There is also an option to allow a terms-of-service check for Sponsors when using the Invitation web form or file upload. The ToS can either be presented inline or be a URL. | 2 | X | X | X |
| Email Address Verification UI | During the claim process, if the email address entered is not asserted from an identity provider, or in the case of Invitation / API based Account Linking is not the address the request was sent to, the end user will be asked to verify the email address. The content of this message is currently not configurable. | 3 | X | X | X |
| Guest Feedback UI | After the end user successfully completes the claim process, they are now considered a guest and will be presented online feedback including both the data collected and messaging configured by the customer. | 4a | X | X | X |
| Guest Feedback Email | The guest will also receive an email to the email address that was established by the claim process. This address can be different from the original email address where the guest received the invitation/account linking request URL. | 4b | X | X | X |
| Sponsor Feedback Email | When Cirrus Invitation is used, the sponsor will receive an email once the invitation claim process is complete. | 5 | X | ||
| Service Provider Invite/Acct Link Authorization Error UI | When Invitation or Account Linking is used to control access to a service provider, this message will be presented when access is not allowed. | 6 | X | X | |
| Self-Reg New Registration Warning | If the “Show warning page” option is enabled, end users that have not previously registered will receive a warning that they have not registered for the service provider. The end user will then be given prompts to either go back and try a different login provider or to proceed on to self-register. The content of this message is currently not configurable. | X | |||
| Guest Expire Notification Email | If configured, the guest will receive a message 30 days before their invitation expires. | 7 | X | X | X |
| Sponsor Expire Notification Email | If configured, the sponsor will receive a message containing a list (max of 20) guests that will be expiring in 30 days. If there are more than 20 guests assigned to the sponsor expiring on the same day, the list indicates the first 20 and there are additional. | 8 | X |
Substitution Strings
A substitution string is a code word that is replaced by values from your Org and SP configuration when the message is displayed or the email is sent. The following table describes the available substitution strings and which messages they can be used for.
| Substitution String | Description | Step 1 | Step 2 | Step 3 | Step 4a | Step 4b | Step 5 | Step 6 | Step 7 | Step 8 |
| APPLICATION_NAME | The "Friendly Name" of the application, from the SP configuration. | X | X | X | X | X | X | X | X | X |
| APPLICATION_LINK | The URL of the application, from the SP invitation configuration. | X | X | X | X | X | X | X | X | |
| EMAIL_VALIDATION_CODE | The validation code used to validate a new email address. This is dynamically generated when a request is sent. | X | ||||||||
| GUEST_SUPPORT_EMAIL | Email address to which support requests should be directed. This is taken from the SP invitation configuration. | X | X | X | X | X | X | X | X | |
| GUEST_FIRST_NAME | The first name of the guest. | X | X | X | X | |||||
| GUEST_LAST_NAME | The last name of the guest. | X | X | X | X | |||||
| GUEST_EMAIL | The email address of the guest used for the invite. NOTE: This value will change if the the end user claims the invitation with an email address different from the orientating address (see INVITE_EMAIL). Once the claim process is complete, this value will reflect the "mail" value on the guest object.X |
X | X | X | X | X | ||||
| GUEST_EPPN | The guest's ePPN. NOTE: This is only known after the guest has accepted the invitation. |
X | X | X | X | |||||
| GUEST_EXPIRATION_DATE | The date on which the guest account will expire. The date will be in the 'Mon DD, YYYY' format, for example 'Jan 1, 2020'. | X | X | X | ||||||
| GUEST_SOCIAL_PROVIDER | The social login provider that was used to claim the invitation. NOTE: This is only known after the guest has accepted the invitation. |
X | X | |||||||
| GUESTS_TO_EXPIRE | The consolidated list of guests assoicated with the sponsor that will expire. | X | ||||||||
| INVITE_EMAIL | The email address the invitation was initially sent to. This value does not change and will be reflected by the data value "mailForInvite" on the guest object. NOTE: This is only reported after the guest has accepted the invitation. Before that, it would equal the GUEST_EMAIL. |
X | X | |||||||
| INVITATION_LINK | The URL to include in the invitation. The user will click on this link to accept the invitation. | X | ||||||||
| INVITATION_VALIDITY_PERIOD | Number of days the invitation will remain valid. | X | ||||||||
| SPONSOR_EMAIL | The email address of the sponsor. | X | X | X | X | X | X | X | ||
| SPONSOR_FIRST_NAME | The first name of the sponsor. | X | X | X | X | X | X | X | ||
| SPONSOR_LAST_NAME | The last name of the sponsor | X | X | X | X | X | X | X | ||
| SPONSOR_FULL_NAME | Full name of sponsor, equivalent to 'SPONSOR_FULL_NAME SPONSOR_LAST_NAME' | X | X | X | X | X | X | X |
Inviting Guests
Overview
Cirrus Invitation provides an interface that can be used by sponsors to invite individuals to become a guest of the organization. This interface can be used interactively to invite small numbers of individuals or it can be used to upload a file to handle larger numbers.
Interactive
To use the interactive user interface:
-
Log in to the Cirrus Console. For sponsors there should only be a menu option “Invitation Service” (administrators will have additional options as shown below)
-
Select “Invite Guests” from the options at the left
-
Follow the instructions from the application owner
-
Provide one or more email addresses for the individuals you wish to invite
-
Agree to the terms of service
-
Press the “Send Invite” button

File upload
Format the list
Before the file can be uploaded, it must be properly formatted. Most customers will find using a spreadsheet application such as Microsoft Excel or Google Sheets a convenient way to compile and format such lists (this example will use Excel).
The file must also contain the data elements expected by your organization’s Cirrus deployment. Customers will typically use one of the following sets of data elements:
Basic List - A list that just contains email addresses. The first row must have the header name “emailAddress” exactly as shown.
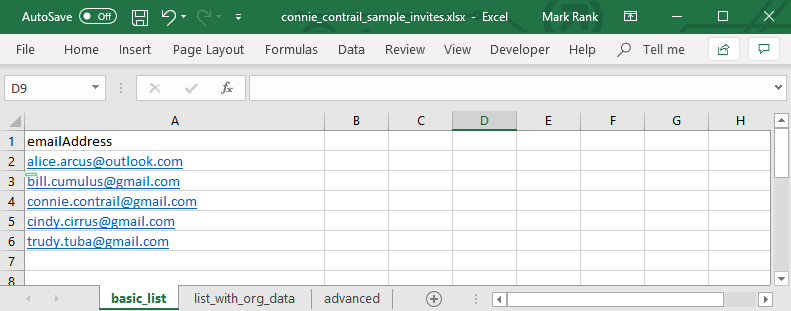
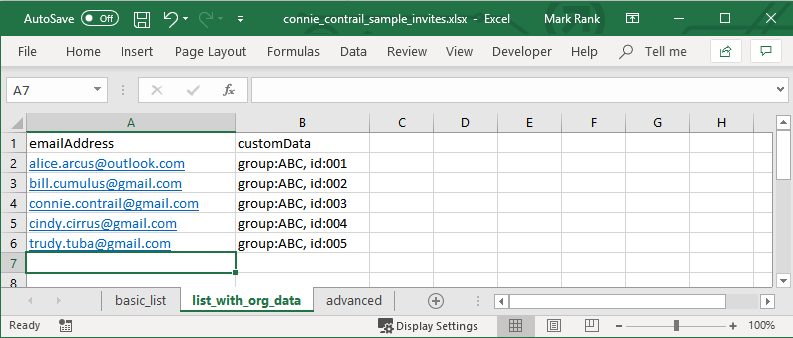
List with Organization Data - A list where each row is an email address and organization identifiers (customData) associated with the individual. This customData will be specific to the organziation’s deployment. The first row must have the header names “emailAddress” and “customData” exactly as shown. The custom data elements are a comma separated list of key:value pairs in a single cell.
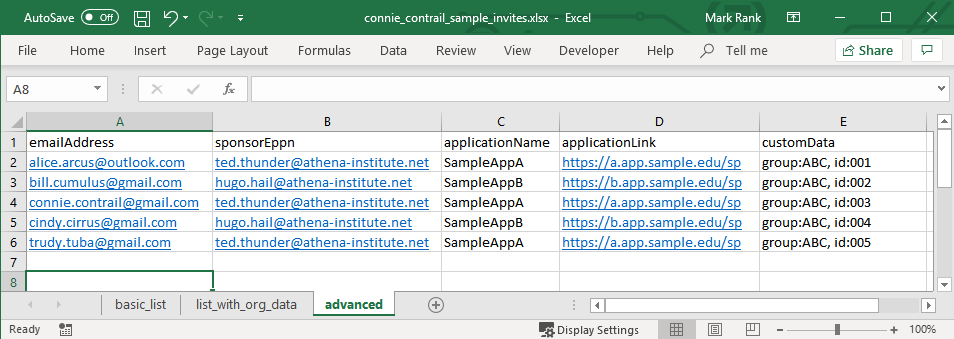
Advanced - A list where each row is an email address and additional data elements to support integration. This can contain any of the elements permitted by the /api/v1/batchInviteCsv Cirrus API endpoint (see the Cirrus API Documentation for details).
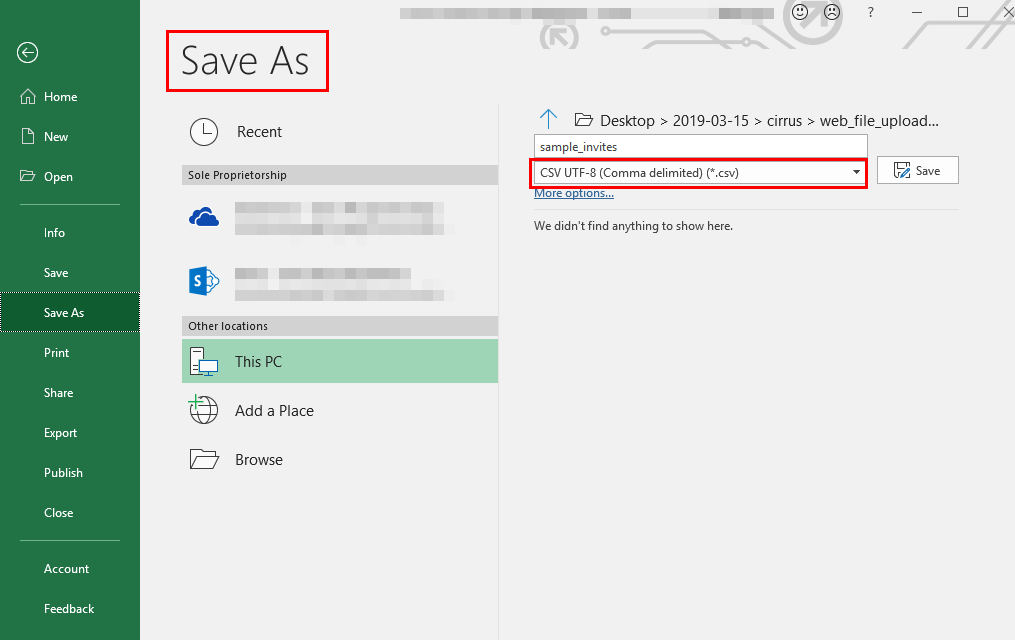
Prepare the list
Once you have the data compiled and formatted, Cirrus Identity expects the file to be a comma-separated-value (CSV) file. For Microsoft Excel, you would use the following dialog to export a spreadsheet as a CSV file.
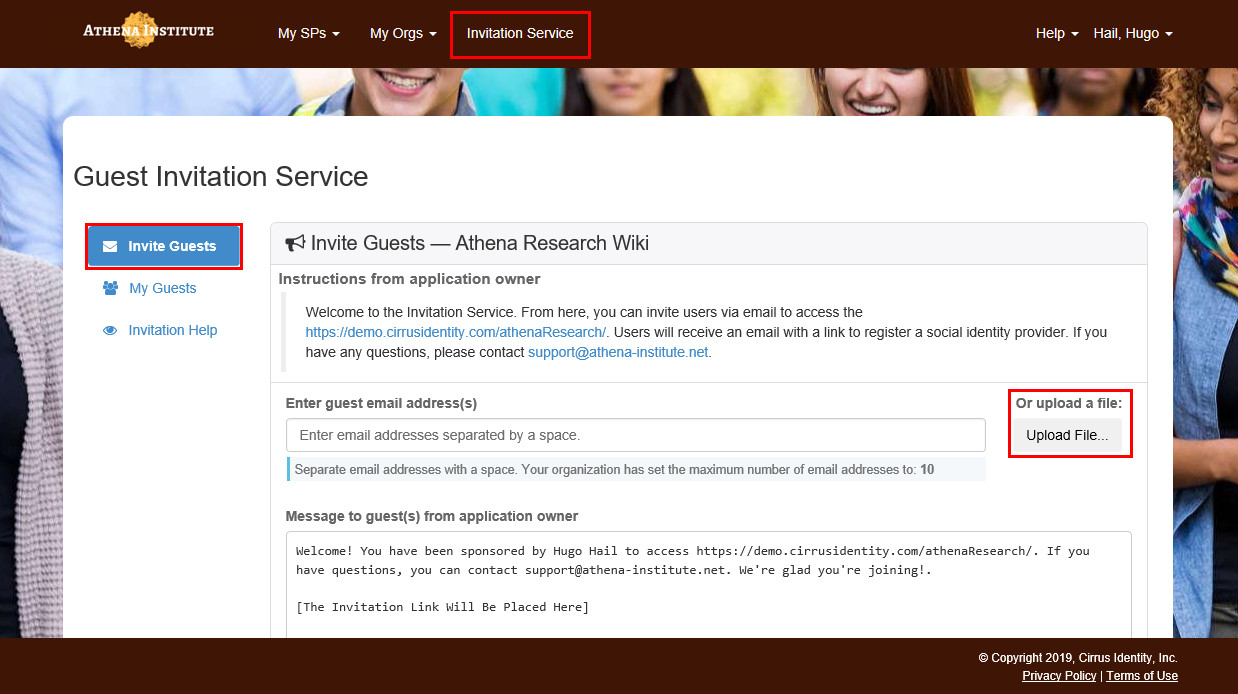
Upload the list
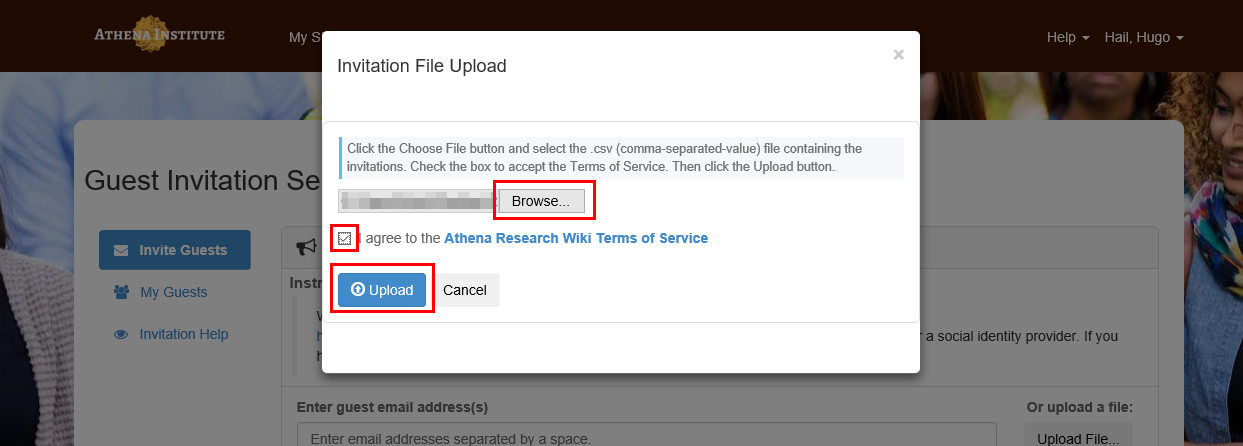
To use the file upload capability:
-
Log in to the Cirrus Console. For sponsors there should only be a menu option “Invitation Service” (administrators will have additional options as shown below)
-
Select “Upload File...” button on the right
-
From the “Invitation File Upload” dialog, browse for the CSV file you created in the “Prepare the list” step
-
Agree to the terms of service
-
Press the “Upload” button -- your list will be processed in the background
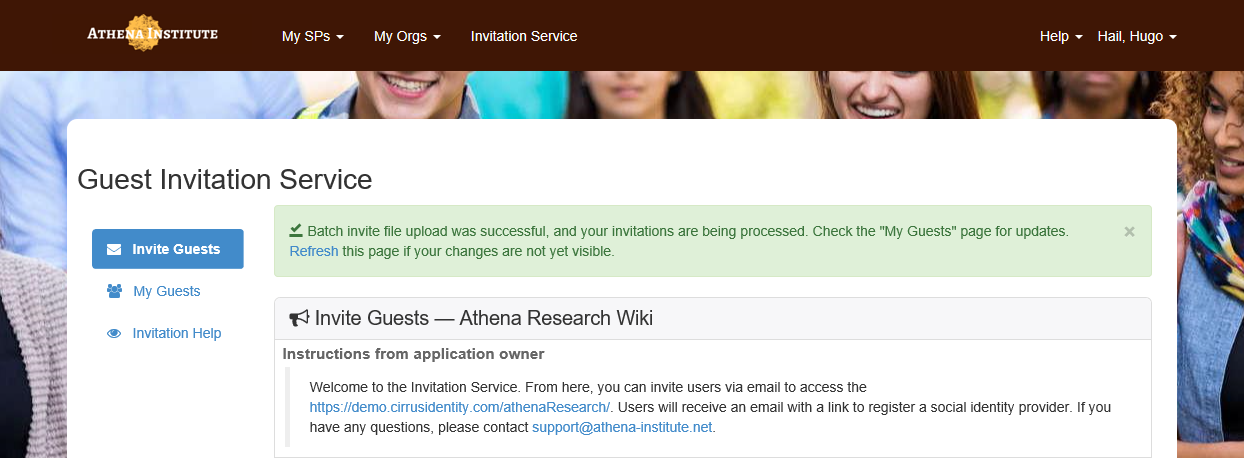
You should see the following after a successful upload.
© Copyright Cirrus Identity, Inc.
.png?height=200&name=Blog%20Image%20Size%20(37).png)