Cirrus Console Documentation

Table of Contents

1. Overview

2. Getting Started

3. My Organizations

4. My Service Providers

Overview

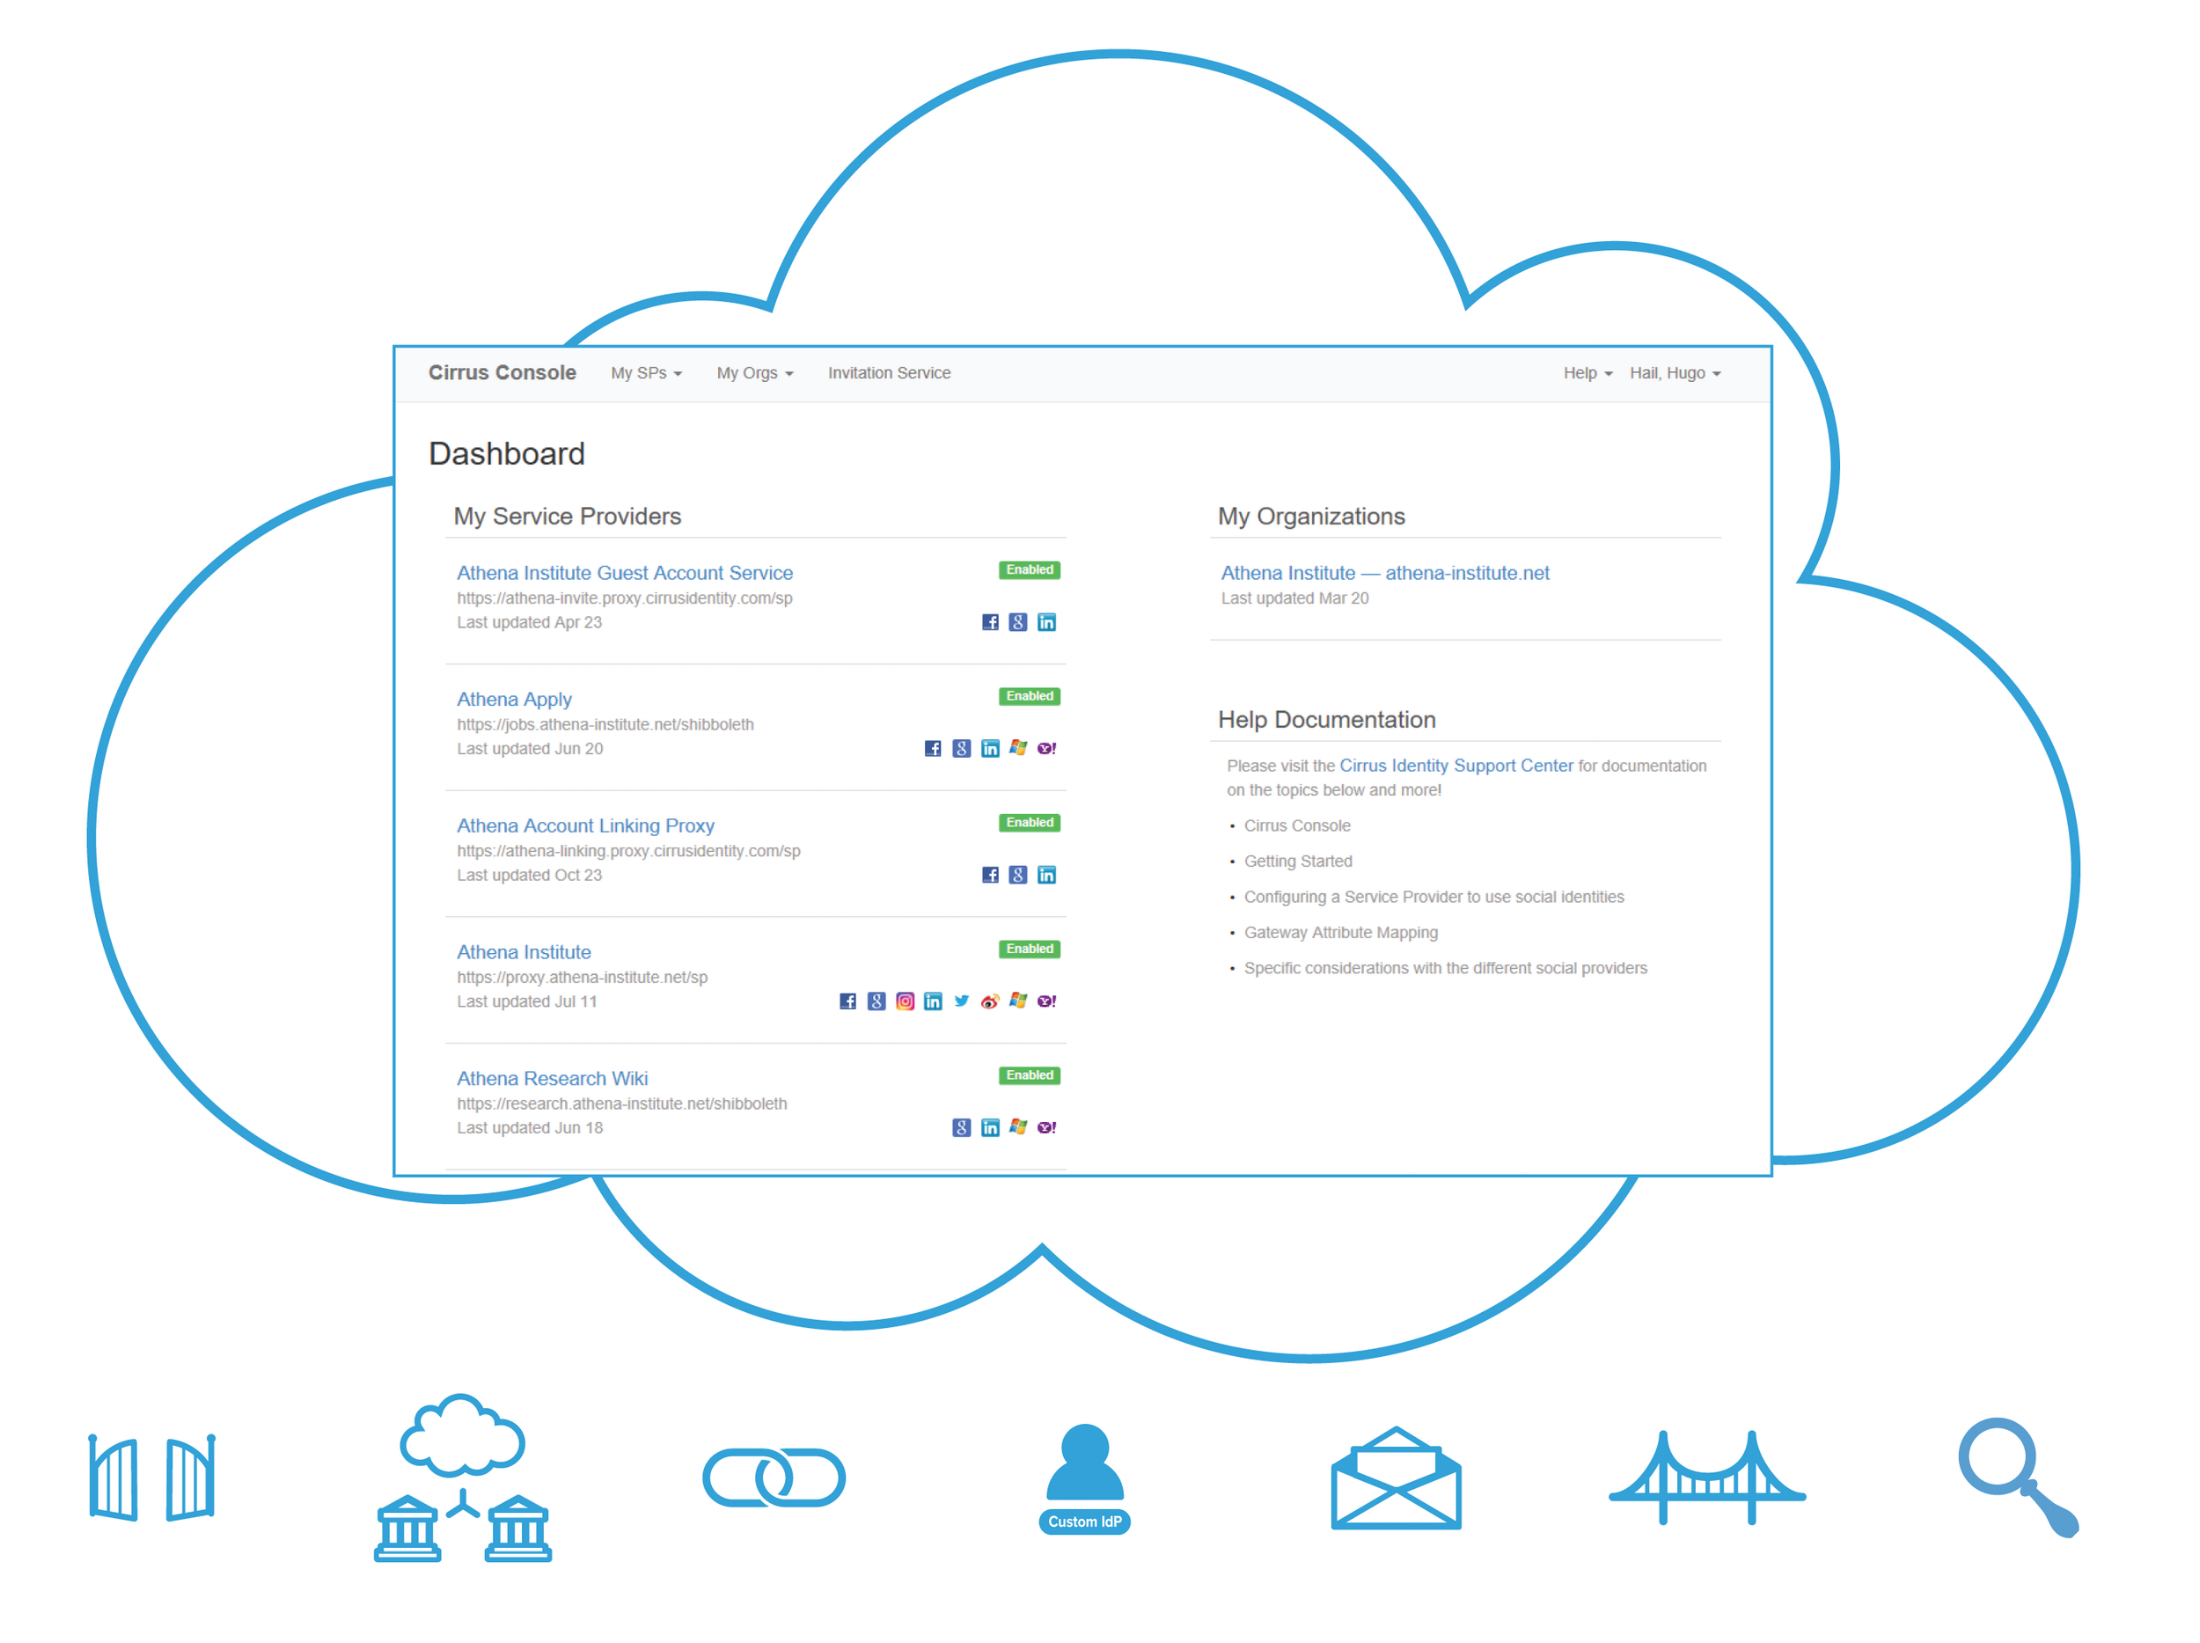
The Cirrus Console is an integrated web based administrative interface for Cirrus Services. Customers authenticate using their organization's Identity Provider. After initial setup, customers are able to authorize additional administrators without contacting Cirrus Identity.

Based on service subscriptions, the Console allows administrators to apply a standard “look and feel” based on the organization's brand, control which social providers are enabled, configure the Cirrus Discovery Service, and configure many aspects of Cirrus Invitation and Account Linking solutions. Configuration is handled with simple controls, drag-and-drop functions, and inline documentation to enable as intuitive an interface as possible.

    • A central dashboard to see which service providers are configured and active
    • Drag-and-drop any InCommon or eduGAIN Identity Provider into your configuration
    • Easily manage multiple social provider integrations with step-by-step instructions for each one right in the tool
    • View and administer invited guests, linked to social identities, and manage the lifecycle of invitations
The Cirrus Identity Console provides configuration options for all of Cirrus’s identity management solutions


Getting Started

The Cirrus Console is the tool admins will use to configure integrations, manage both Service Providers (SPs) and Identity Providers (IdPs), set user interface styling, and much more. The Cirrus Console supports federated and social login via our own Discovery and Gateway services. Our customers access the Cirrus Console from their enterprise accounts, so the first step is to establish trust between the Cirrus Console and your enterprise IdP.
 
1) Your institutional IdP configuration
 
To log in to the Cirrus Console, Cirrus Identity recommends your institutional IdP release both the mail and eduPersonPrincipalName attributes to the Console service provider. It is technically possible to access the Console with either attribute, but functionality may be limited. For example, accessing the Invitation Service explicitly requires the mail attribute when controlling invitation sponsorship using a list of email addresses.

The service provider for the Console is listed in the InCommon metadata with an entityID of: "https://apps.cirrusidentity.com/shibboleth"
 
 
Subscribing customers will have initial organizational administrators (Org Admins) provisioned as part of customer on boarding. Organizations that choose to conduct a trial or a proof-of-concept with Cirrus Identity may also be provisioned with access as part of the trial/proof-of-concept. Organization administrators can add additional administrators at anytime by going to “My Orgs | Admins” in the Console.
 
3) Log in to the Cirrus Console
 
Once the individual is set up as an administrator and organization’s Identity Provider is releasing email and/or ePPN attributes to the Console, the individual can try logging in by selecting “Login” from the Cirrus Identity website top navigation bar. The individual will be taken to a Cirrus Discovery Service screen. The individual’s organization will be available as a provider choice. See the next section for additional detail.
 
Logging into the Cirrus Console
 
To access the Cirrus Console, click the Login at the top of the Cirrus Identity website. Once you reach the login page, you will need to select your identity/login provider from the Cirrus Discovery Service.
Cirrus Console.png


You can search for your provider by typing in the text field. If your provider is not listed, please contact support@cirrusidentity.com.


Cirrus Console 2.png
If you receive an error when you attempt to log in, a common reason is your organization’s identity provider is not configured to trust the Cirrus Console. Please see Step #1 of Console | Getting Started.
 
The Cirrus Console - Dashboard
 
Once logged into the Console, you will be presented with a dashboard that indicates both the organization and the service providers you have access to.
hugo_hail_dashboard_no_mysp.png
The My Organizations section lists the organization you are associated with and will be highlighted if you are an organization level administrator. The My Service Providers section lists any service providers which you are able to administer. For more details about each of these sections, see the following:

My Organizations

You can access the My Organizations section by clicking on the organization name on the dashboard, or by selecting the name in the My Orgs menu at the top of the application.
hugo_hail_dashboard_no_mysp.png

Organization

The Organization page lists basic information about your organization, like Organization Name, Support Email, Organization URL (this must match a value in the federation metadata), and Org Admins.

hugo_myorg_org.png

Admins

The Admins page is where you manage the attributes about the admins for your organization. On this page you can create and edit admins. Once you have an admin created, you can make that admin an Org Admin on the Organization page, or a Service Provider admin on the Service Providers page.
hugo_myorg_admin.png

Service Providers

The Service Providers page is where you manage which Service Providers are available to your organization and which admin(s) have the ability to manage them. The list of Service Providers comes from the various federation metadata files that the Cirrus Gateway supports, and is derived from the OrganizationURL in the metadata. We can add additional SPs by request, or your organization can set up a metadata file that we can consume programatically.
hugo_myorg_sp.png

Social Providers

The Social Providers page is where you manage which social login services will be made available to your organization. By selecting Social Providers on this page, you will make them available for each Service Provider to use. If you only enable Facebook and Google, then your Service Providers will be able to able to use those two providers, and will not be able to use Twitter, Microsoft, or the others.
hugo_myorg_soc.png

User Interface

The User Interface page provides configuration for the global user interface elements of the Cirrus Identity products. Most customers will minimally set a top banner/footer color and upload a custom logo.
hugo_myorg_ui.png
 

My Service Providers

You can access the configuration for a Service Provider by either clicking on the name of the Service Provider on the dashboard, or by selecting the name of the Service Provider from the My SPs menu at the top of the page.
hugo_hail_dashboard_with_mysp.png
This guide is designed to make setting up your service provider/application in the Cirrus Console as smooth as possible.


Service Provider Metadata

Cirrus Products require minimal configuration when used with Service Providers from InCommon or one of the other [eduGAIN federations] https://technical.edugain.org/status) for federated identity management. In the United States, InCommon is the Higher Education federation, and the metadata for service providers is managed with the Federation Manager App. If you are a member institution of InCommon (you can view the list on their Current InCommon Participants page), make sure your Service Provider is registered.
 
Cirrus Products work equally well with Service Providers that are not registered with a federation — there are just some additional steps to setup the metadata. Contact support@cirrusidentity.com and we can provide you with guidance.
 
Set SAML DiscoveryResponse In Metadata
 
One of the pieces of information that can be supplied about your SP to the InCommon Federation Manager is something called the "Discovery Response Endpoint". This information is usually generated by your SP software, but since it is not mandatory in the Federation Manager App, sometimes the information is not entered. This SAMLDiscoveryResponse endpoint must be entered into the form for your SP. If you have questions about what this endpoint value is, contact your campus/institution Identity Management group, and they should be able to help you figure out what this is. If not, contact support@cirrusidentity.com, and we can provide you with guidance.
 
Application Response Location
 
A SAML service provider needs to know where to send a user after he or she has authenticated and the service provider has handled the authentication request for the user. This location is the “application response location”, and it is a URL on your application which usually handles logging a user into the application itself.


Social Provider Configuration

In order to allow your application/service provider to use social login with the Cirrus Gateway, you need to establish an OAuth key and secret with each of the providers you wish to use. Doing this setup sets up a trust relationship between your SP, the Cirrus Gateway, the Social Provider, and ultimately the end-user. To establish this trust, you provide details about your application like name, a logo, and maybe a privacy policy. The Cirrus Gateway will provide technical information in the form of a authorized redirect URL. Finally, the Social Provider will provide an API key and secret to securely bind the authentication flow together. You will want to review the Cirrus Gateway getting started as well as the Initial Social Provider API Integrations section.
 
The basic attributes for each service provider are configured at the top of the Gateway Service page. Help for each attribute is also provided on the page.
hugo_gateway_w_soc.png


The Social Providers available for the Service Provider to authenticate are selected at the bottom of the Gateway Service page. Providers selected will be available for configuration, and later presentation in the Discovery Service.
soc_option.png


The list of Social Providers that can be configure for each Service Provider are listed to the left. When initially enabled, the Cirrus Identity Console will indicate providers need to be configured. The mapping of the attributes for each Social Provider may also be accessed at the bottom of the list.
soc_unconfig.png

Configuring Discovery

The Cirrus Discovery Service allows you to include both traditional Identity Providers (IdPs) like your home institution as well as social login options from the Cirrus Gateway in a unified login user interface that conforms to the SAML V2 Discovery Profile. The Discovery Service page in the Cirrus Console is where you configure which Identity Providers are allowed to access the Service Provider. See both Cirrus Discovery getting started and Using Discovery Service for more details.
 

© Copyright Cirrus Identity, Inc.

Blog comments