Cirrus Discovery Documentation

Table of Contents

1. Overview

2. Planning Steps

3. Getting Started

4. Using Discovery Service

5. Service Provider Discovery Configuration


Overview

Cirrus Discovery is a discovery service conforming to the SAML V2 Identity Provider Discovery Profile. This provides a needed capability in multilateral federation by allowing service providers to determine (or discover) the identity provider associated with an end user attempting to access the service provider. In practical terms, Discovery becomes the interface end users interact with to navigate to the identity provider they will use to authenticate.

Cirrus Identity’s Discovery product allows users to login via InCommon or EduGAIN, customer-specific identity providers (idPs) or social logins via the Cirrus Gateway.

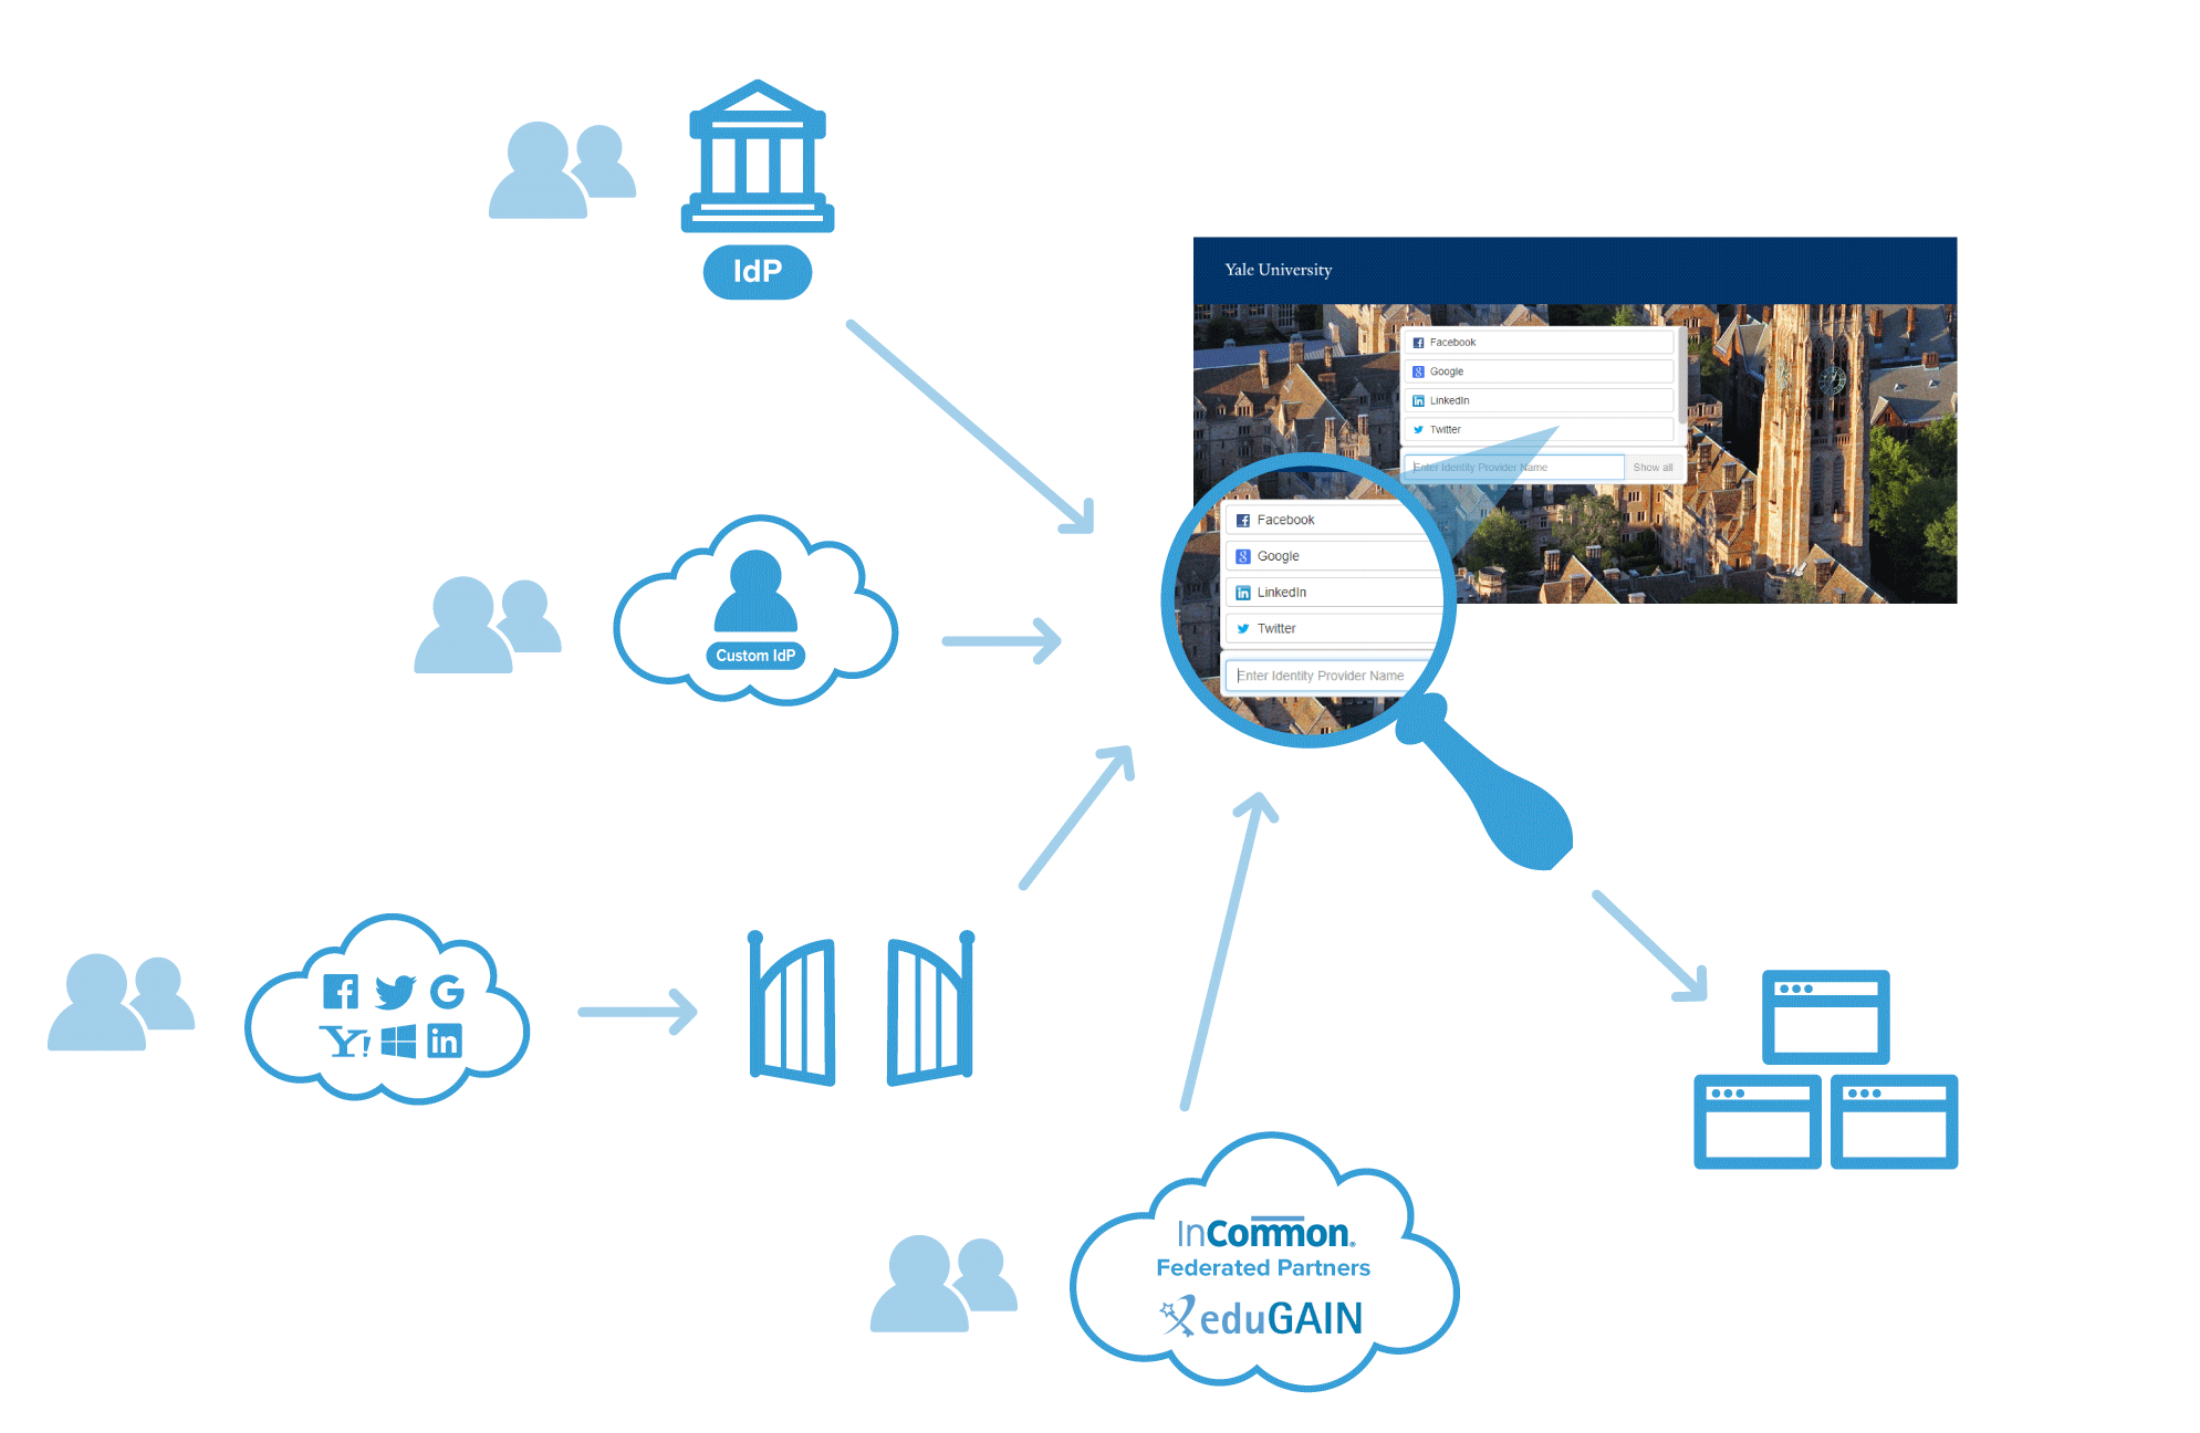
Discovery is integrated with InCommon and the trust federations of eduGAIN. This gives customers access to this global metadata resource though an easy to use interface. In addition to these globally defined identity providers, Cirrus can configure IdPs that are customer specific. This allows customers to mix published and unpublished IdPs. These customer specific IdPs can include the Cirrus External Identity Provider. Finally, Discovery is integrated with Cirrus Gateway giving it the capability to also add social identity providers such as Google, Facebook, Microsoft, LinkedIn, or others as peers to traditional IdPs.

Discovery is also fully integrated with other Cirrus Modules, and is configured using the Cirrus Console. Discovery uses the global UI configuration customers establish for their brand and is responsive so it will display equally well on the desktop and on mobile devices. The configuration established for Discovery is carried over to the claim interface for Cirrus Invitation and request based Cirrus Account Linking. The same configuration is also leveraged for Cirrus Self-Registration.


Planning Steps

Step 1 - Determine your audience

The first planning step for Cirrus Discovery is to determine the audience and which identity providers that audience will need:
  • Will the audience primarily use social login options provided by Cirrus Gateway (Google, Facebook, Microsoft, LinkedIn, or others)?
  • Will the audience use the Cirrus OrgBrandedID?
  • Will the audience use the organization’s primary/enterprise Identity Provider?
  • Will the audience use other organization Identity Providers?
  • Will the audience use Identity Providers from InCommon or other eduGain federations?
The answers to these questions will influence the style of Discovery you choose.
 

Step 2 - Determine the desired end user experience

The second planning step is to determine the desired experience for end users to discover the Identity Provider they are going to use for login:
  • Are end users going to be just directed to the Service Provider, and a discovery page should appear if needed?
  • Are end users going to be directed to a website page, and discovery should be embedded on that page?
  • Do you want to avoid discovery, and you know enough about each audience segment that we just want to embed static links on one or more website pages?
The answers to these questions will also influence the style of Discovery you choose.
 

Step 3 - Interactions with other Cirrus Modules / Features

Some Cirrus Modules have constraints that can influence how Discovery is configured:

Step 4 - Select the style of Discovery to implement

The most common choice is to use a SAML compliant discovery service, and the easiest is to use Cirrus Discovery integrated with the Cirrus Identity Products. Cirrus Discovery operates in two basic modes: “List Style” and “Button Style”. The following table providers a comparison between the two styles:
 
Discovery Style Button Style List Style
Recommended Number
of Identity Providers
Less than Ten Large Numbers
Supports Federated IdPs Yes Yes
Supports Social Login Yes Yes
Supports Custom IdPs Yes Yes
Control Display Order
of IdPs
Yes Yes
Add Header/Footer Text Yes Yes
Customize IdP Branding
(non-social IdPs only)
Yes No
Add Text Between IdPs Yes No
Put IdPs on Different Tabs No Yes
Search Box for IdPs No Yes
Supports iframe
Embedding
No Yes

Customers can also choose to bypass discovery. This choice is useful in those cases where the navigation for an audience is well understood (for example going from a portal to an application). For more information, see Cirrus Identity Provider Proxy discovery configuration or contact Cirrus Support.

Next you will want to look at Cirrus Discovery | Getting Started.
 

Getting Started

Customers will often subscribe to one or more additional Cirrus Identity modules to support desired implementations. Cirrus Discovery is included with all Cirrus Identity subscriptions.
 
The following steps are needed to get started with Cirrus Discovery:
 
1) Customers should take a moment and think about their Discovery Deployment. Cirrus Identity can offer generally accepted practices, customer stories, and professional services to help. Reviewing the questions covered by the Cirrus Discovery | Planning Steps is a good first step:
  • Determine your audience
  • Determine the desired end user experience
  • Interactions with other Cirrus Modules / Features
  • Select the style of Discovery to implement
2) Depending on the customer, Cirrus will provision other modules based on the customer’s subscription (or trial/PoC agreement). Modules such as Cirrus Gateway, Cirrus Invitation, Cirrus Account Linking, Cirrus OrgBrandedID, and Cirrus Identity Provider Proxy each have associated setup. See the “Getting Started” for each module as appropriate:

3) If there is an identity provider that is needed by the Discovery audience, but the metadata for the IdP is not published to federation metadata (for example InCommon or eduGAIN), the metadata needs to be sent to Cirrus Identity Support (support@cirrusidentity.com) for configuration.

4) A member of the organization needs to have access to the Cirrus Console and to be granted the “Organization Administrator” (org admin) role for your organization (See Cirrus Console Getting Started).
 
5) If the SP (or SP side of a Cirrus Identity Provider Proxy) has not already been defined in the Console, an org admin will create the SP in the Console so it can be configured. At this point, the org admin may also designate an SP admin to complete the setup.
 
6) From the Cirrus Console, an admin will start the Discovery configuration by picking the required identity providers -- social providers will automatically be included based on the Cirrus Gateway configuration (see Cirrus Gateway Getting Started).
 
7) From the Cirrus Console, an admin will then:
  • Adjust the ordering of the identity providers
  • Choose either “Button Style” or “List Style”
  • For “Button Style”; be sure to apply branding for the IdP buttons, and any “spacer” text between the IdP buttons
  • For “List Style”; options include configuring two tabs to list sets of IdPs separately, configuring for use with iframes, and configuring for search
  • Add any desired header or footer text
8) From the Cirrus Console, the admin can save and preview the Discovery configuration
 
9) Change the configuration for all SPs that will use Cirrus Discovery - the discovery URL should be set to "https://apps.cirrusidentity.com/console/ds/index". Details for configuring a Shibboleth SP are available here.
 
Once these steps are complete, you are ready to use Discovery.
 

Discovery | Getting Started

Customers will often subscribe to one or more additional Cirrus Identity modules to support desired implementations. Cirrus Discovery is included with all Cirrus Identity subscriptions.

The following steps are needed to get started with Cirrus Discovery:

  1. Customers should take a moment and think about their Discovery Deployment. Cirrus Identity can offer generally accepted practices, customer stories, and professional services to help. Reviewing the questions covered by the Cirrus Discovery | Planning Steps is a good first step:

    • Determine your audience

    • Determine the desired end user experience

    • Interactions with other Cirrus Modules / Features

    • Select the style of Discovery to implement

  2. Depending on the customer, Cirrus will provision other modules based on the customer’s subscription (or trial/PoC agreement). Modules such as Cirrus Gateway, Cirrus Invitation, Cirrus Account Linking, Cirrus External Identity Provider, and Cirrus Identity Provider Proxy each have associated setup. See the “Getting Started” for each module as appropriate:

  3. If there is an identity provider that is needed by the Discovery audience, but the metadata for the IdP is not published to federation metadata (for example InCommon or eduGAIN), the metadata needs to be sent to Cirrus Identity Support (support@cirrusidentity.com) for configuration.

  4. A member of the organization needs to have access to the Cirrus Console and to be granted the “Organization Administrator” (org admin) role for your organization (See Cirrus Console Getting Started).

  5. If the SP (or SP side of a Cirrus Identity Provider Proxy) has not already been defined in the Console, an org admin will create the SP in the Console so it can be configured. At this point, the org admin may also designate an SP admin to complete the setup.

  6. From the Cirrus Console, an admin will start the Discovery configuration by picking the required identity providers -- social providers will automatically be included based on the Cirrus Gateway configuration (see Cirrus Gateway Getting Started).

  7. From the Cirrus Console, an admin will then:

    • Adjust the ordering of the identity providers

    • Choose either “Button Style” or “List Style”

    • For “Button Style”; be sure to apply branding for the IdP buttons, and any “spacer” text between the IdP buttons

    • For “List Style”; options include configuring two tabs to list sets of IdPs separately, configuring for use with iframes, and configuring for search

    • Add any desired header or footer text

  8. From the Cirrus Console, the admin can save and preview the Discovery configuration

  9. Change the configuration for all SPs that will use Cirrus Discovery - the discovery URL is "https://apps.cirrusidentity.com/console/ds/index". Details for configuring a Shibboleth SP are available here.

Once these steps are complete, you are ready to use Discovery.

Using Discovery Service

The Cirrus Discovery Service can be used directly with Service Providers or with the Cirrus Identity Provider Proxy. In both cases, the Discovery Service can be configured by going to the Discovery Service menu in the Cirrus Console. To gain a broader overview of configuring the Service Provider (or the service provider side of a Proxy), see Cirrus Discovery documentation.
 

Configuring Identity Providers

The top of the Discovery Service page is where you configure which Identity Providers are allowed to access the Service Provider. There are lists for different Federations of Identity Providers as well as custom federations that have been created by Cirrus Identity to support customer deployments (for example the "Athena Federation" supports our demonstration organization).
 

To add an identity provider to Discovery , checking the box to the left. The identity provider will appear in the Selected IdPs list. To draw attention to specific identity providers in the Discovery interface, drag them to the “Preferred Providers” list. Preferred providers are listed in the order presented and can be placed on a separate tab in Discovery if desired.

If Cirrus Gateway is also being used, any Social Login Providers will also appear in the Selected IdPs. As with traditional identity providers, the Social Login Provider can be placed on the left to appear in a preferred position.

See Cirrus Discovery getting started for more details.
hugo_disco_basic_annotated.png

Discovery Style

The Cirrus Discovery Service supports two general styles:
  • List Style — Useful for larger numbers of Identity Providers
  • Button Style — Useful when combining Social Providers with a handful of traditional Identity Providers
Configuring List Style Discovery

List style discovery is the default when a Service Provider is first configured. Unless Identity Providers are moved to the “Preferred Providers” column, providers are listed in alphabetical order when presented for discovery.
list_config.png
This configuration will generated a Discovery user interface as follows:
list_view.png
The “Preferred Providers” can be put on their own tab if desired:
preferred_provider.png
Resulting in a Discovery user interface as follows:
list_preferred_view.png
Configuring Button Style Discovery

The Discovery style can be toggled to Button Style with a single configuration change:
button_config.png
The order is controlled by putting identity providers in the “Preferred Providers” column:
button_order.png
Button Style delivers a fixed format for the Social Login Providers but does allow organizations to format any traditional Identity Providers:
button_format.png
This results in a Discovery user interface as follows:
button_view.png
Text can also be inserted between buttons of traditional Identity Providers:
button_text_config.png
This results in a Discovery user interface as follows:
button_with_text_view.png
Headers and Footers
 

Text headers with associated formatting can be added:

header_config.png
This results is a Discovery user interface as follows:
header_view.png
A footer can also be added:
footer_config.png
This results in a Discovery user interface as follows:
header_footer_view.png
Both the header and footer can also be configured to take on a wider format:
wide_config.png
Resulting in a Discovery user interface as follows:
wide_view.png
  

Service Provider Discovery Configuration

How to configure your Service Provider to use discovery depends on what SAML aware software product you use, and if you are using the embedded or standalone discovery.
 

Below are sample configurations of the most common setups our customers use.

Using the Cirrus SAML Proxy?

If you are using your SP with Cirrus's SAML Proxy then you do not need to configure discovery on your SP. You configure your SP to use the Proxy for authentication and the Proxy will take care of showing the correct discovery interface when a user logins. See Shibboleth Configuration Examples for how to use the Proxy.

If you are trying to customize the user experience for discovery at your SP when using the proxy then view your options.
 

Using the Gateway directly?

If you are using Cirrus gateway directly with your SP then you can configure your SP to use the Cirrus Discovery Service.

Shibboleth

Shibboleth supports configuring a discovery URL in the <SSO> block inside shibboleth2.xml
 
<SSO discoveryProtocol="SAMLDS" discoveryURL="https://apps.cirrusidentity.com/console/ds/index">
 

SAML2 SAML1

</SSO>
 

You simply provide a URL to the Cirrus Discovery Service and Shibboleth will add on any required query parameters.

SimpleSAMLphp

SSP supports configuring a discovery URL in your SAML:SP authsource.

$config['my-sp'] = array(
 

'saml:SP',

// A bunch of your configuration
 

'idp' => NULL,

'discoURL' => 'https://apps.cirrusidentity.com/console/ds/index',
 

);

You set the 'discoURL' to the Cirrus discovery service and set 'idp' to null (or ensure it is not set).

Spring Security SAML

Spring security expects a non-standard query parameter name (idp instead of entityID )in the response from the discovery service. You will need to tell the Discovery Service to use this alternate name using the returnIDParam name.
 

https://apps.cirrusidentity.com/console/ds/index?returnIDParam=idp&otherSetting 

© Copyright Cirrus Identity, Inc.

Blog comments