.png?height=200&name=Blog%20Image%20Size%20(36).png)
Overview
Table of Contents
- Overview
- Pre-Provisioning Steps
- Gather Configuration Values
- Configure Application in Your IdP
- Test the Integration
- Configure CAS URLs (CAS only, required)
- Register Your Bridge in InCommon (SAML only, optional)
- Configure Additional Applications and Test (optional)
- Access Events Logs (optional)
Overview
The Cirrus Bridge is focused on supporting an authentication provider for the purposes of registering a federation IdP and/or consolidating applications supported by legacy authentication providers toward a desired enterprise authentication provider. As such, the Cirrus Bridge is implemented between an organization’s primary identity provider (any SAML-based IdP) and SAML or CAS enabled service providers (applications). For applications that use OIDC, we recommend integrating them directly with your organization’s primary identity provider.
If your primary identity provider is Entra ID, Okta, or Duo SSO and you are comfortable granting API access to the Bridge to validate application configuration, then you can run our Enterprise Bridge which allows you greater control over your configuration, including what attributes are released to the Bridge for different applications. With Enterprise Bridges, most configuration occurs within your primary identity provider and the Bridge passes through most attributes with some transformations to conform to the REFEDS Research and Scholarship requirements and eduPerson specification.
The Cirrus Standalone Bridge is available with any SAML-based identity provider that can generate metadata, such as Google, Ping, or RapidSSO. It does not require that you grant API access, however post-implementation changes are currently requested through support tickets.
Pre-Provisioning Steps
Before the Implementation team kicks off your implementation, we will ask you for information so that we can provision your Bridge. We do this so that we can start configuring your Bridge during the first call and with many customers we are able to complete this initial configuration quickly. Below are the types of pre-provisioning information we will ask for, based on your Bridge configuration. Once these steps are complete, we will schedule the kickoff meeting.
Allow Cirrus Bridge API Access (Enterprise Bridges Only)
This step is completed during the provisioning process with the Cirrus Implementation lead. Follow the steps for your primary identity provider outlined in Provisioning Information for Enterprise Bridges.
Domain Validation (DNS Add-On Only)
If you are porting over your existing SAML entity ID or CAS service URLs from your previous identity provider to the Cirrus Bridge, you will be using our DNS Add-On service. We will ask you for the fully-qualified domain names (FQDN) for each domain we are porting over. And then once the Bridge is provisioned, we will ask you to complete domain validation so that we can issue TLS certificates from AWS. You will be asked to create a DNS record in your domain with the provided CNAME/Value pair and confirm when complete.
Existing Signing/Encryption Certificates and/or Salts (SAML, DNS Add-On Only)
If you are porting over your existing configuration, please securely provide this information to your implementation lead.
Gather Configuration Values
Next you will gather the configuration values for your Application(s) in your IdP. To complete these steps, you will need the following:
- Entity ID(s) for the service providers (SPs) you are configuring
- Assertion Consumer Service (ACS) url for the Cirrus Bridge
- NameID format and value
- Attributes you will be adding, including any Cirrus rules for needed transformations
- Encryption certificate url (optional, needed if you will be encrypting assertions)
- Information on how MFA is done for your institution
Your implementation lead will provide some of these values and also work with you to determine the rest. Common information and guidance is provided below.
Common Elements: ACS URL and Encryption Certificate URL
The ACS and Encryption Certificate URLs are common to all Applications created for the Bridge.
Per Application Elements
Please visit our Authentication Profiles for Cirrus Bridge page to compile the list of additional elements. Please start with the Default, configure, and then test, and then move on to developing any additional profiles you may need with a similar process.
Configure Application in Your IdP
Next we will configure the Bridge in your identity provider. Please select your type of bridge and identity provider below to access the specific steps.
- Configure Enterprise Bridge for Entra ID
- Configure Enterprise Bridge for Okta
- Configure Enterprise Bridge for DuoSSO
- Configure Standalone Bridge for any SAML Identity Provider
Test the Integration
Once the default application is configured, you will test the integration using the test application provided by Cirrus Identity to test authentication to your Cirrus Bridge.
Step 0 - Update your local hosts file (optional, needed for DNS Add-On)
If you are utilizing the DNS Add-On, you will need to modify your local hosts file to point the FQDN to the IP address provided by your implementation lead.
On Mac computers, this file can be found at /etc/hosts. On Windows computers, it is typically found at C:\Windows\System32\drivers\etc\hosts.
Step 1 - Navigate to Your Cirrus Testing URL
The testing URL is unique for your Cirrus Bridge implementation and will be provided to you by your implementation lead. In a private browser window or incognito window, navigate to the test URL.
Example: https://athena-bridge.cirrusidentity.com/demo.php
Click on the link for ‘Test authenticating with Cirrus’’.

Step 2 - Authenticate and Review
Authenticate and review. You should be prompted for MFA if you have enabled it. After successfully authenticating, you should see a screen for your institution similar to the one below.
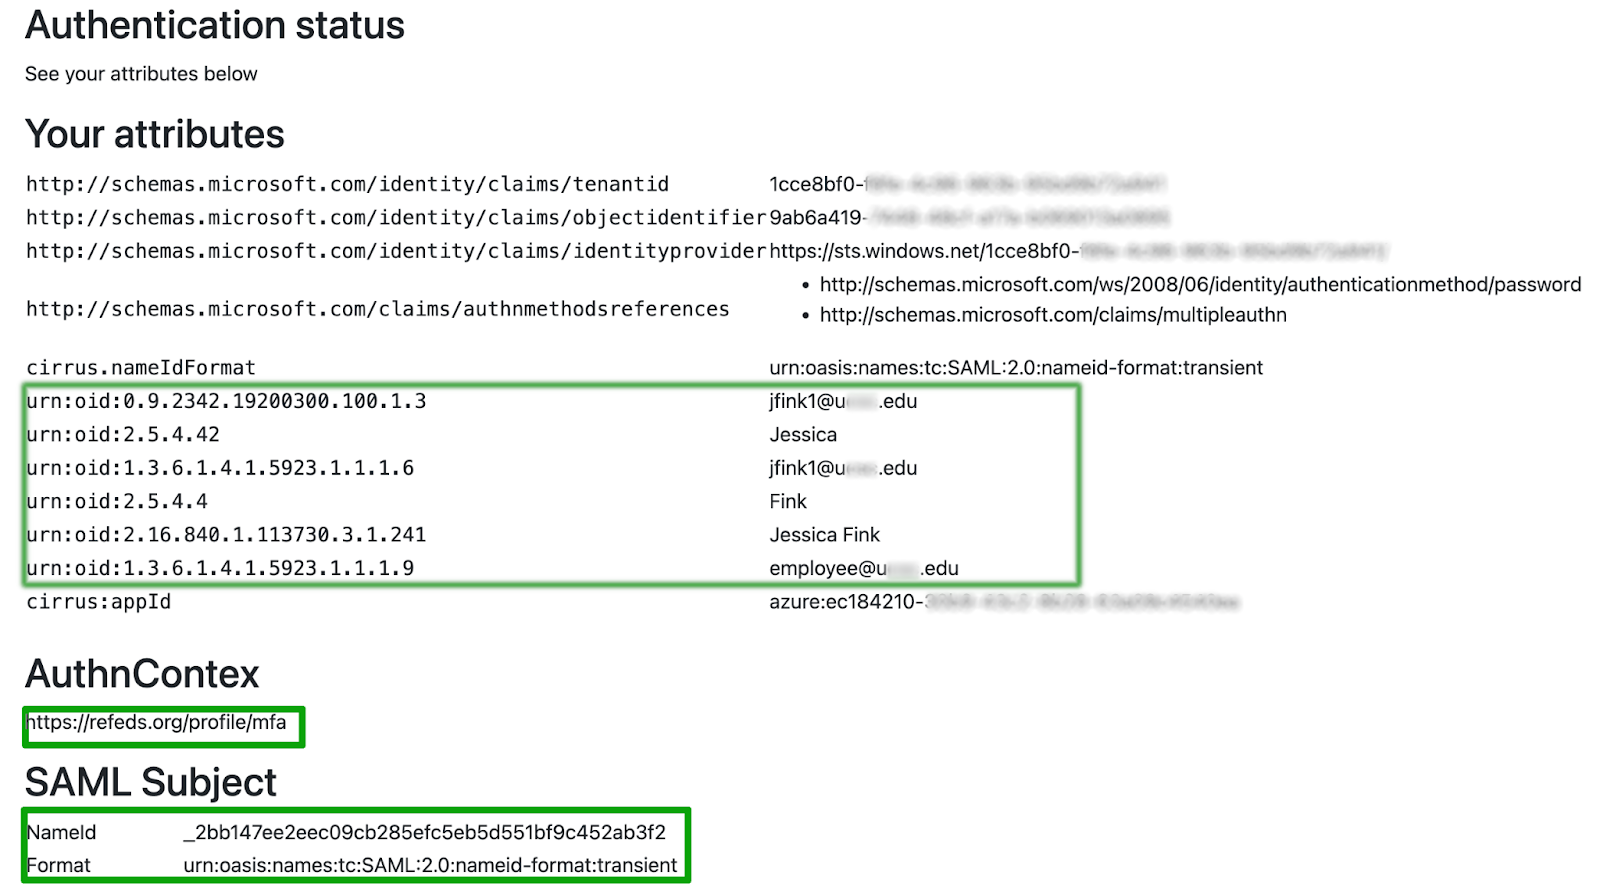
Verify that your attribute values are correct, that the AuthnContext comes through as https://refeds.org/profile/mfa, and that the SAML Subject NameID and format are coming through as expected. The default NameID format is usually transient with a random value for the NameID itself.
Configure CAS URLs (CAS only, required)
The next step for CAS is to complete the configuration of your CAS service urls and test. Information on this process can be found at Managing CAS Service URLs.
Register Your Bridge in InCommon (SAML only, optional)
If you would like to register your Bridge in InCommon, your Implementation Lead will provide the needed information to you to register your Bridge using the InCommon Federation Manager. Follow the steps outlined in Registering Cirrus Bridge with InCommon to complete this step.
Configure Additional Applications and Test (optional)
Once the default Bridge is configured, you will work with your implementation lead on your SP Inventory and completing any additional SAML and/or CAS Applications as needed until you have all SPs have the needed configurations. This is often an iterative process where an Application is built, SPs are tested, and errors noted, troubleshooted, and resolved.
Access Events Logs (optional)
Cirrus offers two options for accessing event logs:
- Stream - A subscription add-on (Cirrus Log API) for organizations who wish to stream Cirrus event log information to an enterprise log management system, such as a SIEM.
- Export - On-demand download of event log information for products in your subscription.
To utilize this functionality, please visit the following pages:
- For streaming logs, see Getting Started with Log API
- For exported logs, see Export Event Logs.
.png?height=200&name=Blog%20Image%20Size%20(37).png)