


Overview Account linking is usually performed when a user authenticates into each of their accounts...
Table of Contents
3. Attribute Authority Add-On Options for Your Use Case
a. Network Access to the LDAP Directory
b. Attribute Retrieval from an LDAP Directory by the Cirrus Attribute Authority Add-On for Bridge
c. Adding Cirrus Attribute Authority Add-On for Bridge Attributes to an Authentication Assertion
i. Using Cirrus Rules to Add Attribute Authority Attributes to an Authentication Assertion
ii. Retrieving and Configuring Attributes
iii. Setting the Behavior for Attributes with Values from both Attribute Authority and an IdP
iv. Example of Cirrus Rules in Action Using Cirrus’ Azure AD Test Environment
5. Configuring Azure AD Custom Claims Provider with Cirrus Attribute Authority Add-On for Bridge
Description
The Cirrus Attribute Authority Add-On for Bridge allows customers to use attributes from a campus LDAP authority to supplement the available attributes from their Azure or Okta IdP environment for logging into Service Providers.
Value
Customers find this service helpful when they have identity data they do not want to store or can not store in Azure or Okta but need to call upon for access to certain Service Providers. The LDAP identity data is available when needed, and the values are not retained outside the LDAP authority. For auditing transactions, Cirrus Identity logs only the attribute name and not the value used in the assertion.
Attribute Authority Add-On Options for Your Use Case
- To allow access from the Cirrus Bridge Attribute Authority to the campus LDAP interface, you must ensure LDAP queries are allowed over the LDAPS protocol port.
- It is recommended that the customer’s LDAP Servers are load-balanced.
- Currently, the service is configured to search using one customer-defined search key (linking attribute) and return attributes using a single query.
- The user attribute a customer selects for searching their LDAP Directory must be the same for their entire Attribute Authority configuration.
Two options exist to add attributes from the Cirrus Attribute Authority for Bridge to an enterprise application’s authentication assertion.
- Azure’s Custom Claims Provider Option
If you use Azure AD, you can configure Azure’s Custom Claims Provider to add attributes from the Cirrus Attribute Authority for Bridge to an enterprise application’s single sign-on assertion. This is possible because when the Cirrus Attribute Authority is operated in this mode, the Attribute Authority conforms to Microsoft’s API specification.
Pros
-
- The ability to use Azure’s claim transformation functionality with Attribute Authority attributes.
- It is a more transparent approach as it is easy to see which attributes are from the Attribute Authority at a glance.
- Attribute Authority attributes are available to applications directly integrated with Azure AD (not using the Cirrus Bridge for authentication.)
- The search value for lookup in the LDAP directory must be userPrincipalName.
- If the attribute store takes longer than 2 seconds to respond, Azure will display an error.
- There is a limited response size. A list of a person’s group memberships is often not possible.
- Attribute names from the API/LDAP must not contain special characters
- If attributes need to be reloaded without logging out, using the Cirrus Rules to add Attribute Authority attributes is a better option than using the Customs Claims Provider.
For more information, see Configuring Azure AD Custom Claims Provider with Cirrus Attribute Authority for Bridge.
- Cirrus Rules Option
Using Cirrus Rules, you can add attributes from the Cirrus Attribute Authority for Bridge to an enterprise application’s authentication assertion in both Azure AD and Okta environments.
Pros
-
- No restrictions on the choice of a search value for lookup in the LDAP Directory
- No limit on response size, making it suitable for group memberships
- LDAP Directory can take up to 8 seconds to respond
- Can be defined multiple times if attributes needed to be loaded from different LDAP directories
- Handles special characters in attribute names
- The Attribute Authority will be queried upon each login to ensure up-to-date data.
Cons
- More challenging to see which attributes are from the Attribute Authority.
For more information, see Using Cirrus Rules to Add Attribute Authority Attributes to an Authentication Assertion
Getting Started
Network Access to the LDAP Directory
Provide the Cirrus Bridge Attribute Authority access to your LDAP interface. This requires allowing LDAP queries over the LDAPS protocol port. Cirrus will provide you with a list of Cirrus IP addresses to allow if LDAPS access is constrained at the network edge.
The connection to a customer’s LDAP Server is encrypted with TLS. Cirrus does not support connecting to a customer’s VPN to access LDAP Directories. Cirrus also does not support connecting over unencrypted LDAP connections.
Attribute Retrieval from an LDAP Directory by the Cirrus Attribute Authority Add-On for Bridge
1. Decide which SAML Service Providers and/or CAS service URLs need additional attributes from an LDAP attribute authority and the naming requirements for those attributes.
2. Establish which available attribute in Azure or Okta will be used to search for a user in the LDAP directory, the search criteria. Example: employeeNumber
3. Provide Cirrus Identity information to create the LDAP search to retrieve the needed attributes.
- FQDN and port of the LDAP Server
- From the example below: ldaps://ldap-ad.example.edu:636
- LDAP service credentials
- Username to use for binding or authenticating to the LDAP server.
- For Active Directory, please let us also know the service credential’s userPrincipalName and the “domain” part of “DOMAIN\username” style username
- Password - must be securely transferred
- Username to use for binding or authenticating to the LDAP server.
- Base DN (Distinguished Name)- search starting place in the LDAP directory tree
- From the example below: 'DC=win,DC=institution,DC=edu'
- Search scope, for example, -s sub. In this case, sub stands for subtree and indicates that the search should be performed recursively on the subtree rooted at the base DN.
- Search filter, which specifies the attribute used for the search criteria
- From the example below: '(sAMAccountName=cirrus-ldap)'
- Names of the attributes to retrieve
- From the example below: cn mail displayName employeeNumber
Example LDAP search query:
ldapsearch -x -H ldaps://ldap-ad.example.edu:636 -b 'DC=win,DC=institution,DC=edu' -D 'EXAMPLE\cirrus-ldap' -W -s sub '(sAMAccountName=cirrus-ldap)' -A cn mail displayName employeeNumber
Adding Cirrus Attribute Authority Add-On for Bridge Attributes to an Authentication Assertion
Using Cirrus Rules to Add Attribute Authority Attributes to an Authentication Assertion
1. Add the attribute that will be used to search the LDAP Directory tree to the attributes in the enterprise application where you require the attributes for the Attribute Authority.
This will provide Attribute Authority access to the attribute in the search criteria to retrieve identity data in the LDAP directory.
2. Signal the use of Attribute Authority as an attribute source in Azure or Okta by releasing the following attribute:- Name: cirrus.rule.attributeAuthority
- Value: The value will be determined by the attributes needed and their configuration requirements. See Retrieving and Configuring Attributes below.
Retrieving and Configuring Attributes
You must use the ‘attributes’ value key to retrieve attributes from the Cirrus Attribute Authority Add-On for Bridge.
|
Value Key |
Example of Key Value Syntax |
Description |
|
attributes |
attributes=idCard; alumniID |
Implied Mapping The list of attributes to use from the Attribute Authority should be separated with a semicolon. The example results in two attributes retrieved by the Attribute Authority, idCard, and alumniID, added to the assertion. |
|
attributes |
attributes=idCard=>card_id;alumniID==> donor_id |
Explicit Mapping The => transfers the value of idCard to a new attribute called card_id. The example results in three attributes added to the assertion. card_id, alumniID, and donor_id |
|
attributes |
idCard=>card_id|physical_id |
Mapping to Multiple Attributes Using the pipe allows mapping to multiple new attribute names. The example results in two attributes added to the assertion, card_id and physical_id. They both will have the value from idCard. However, an attribute named idCard will not be asserted |
Setting the Behavior for Attributes with Values from both Attribute Authority and an IdP
The mode value key sets the behavior for attributes that exist in both the IdP and the Attribute Authority. If no mode is specified, the default mode is to merge the values of an attribute with the same name in both sources to create a multivalued attribute. Any duplicate values within a multivalued attribute will be deduped.
In the chart examples below, Azure AD and the Attribute Authority each have an eduPersonAffiliation attribute.
|
Value Key |
Examples of Key Value Syntax |
Description of Syntax and Function |
|
mode |
mode=merge, attributes=eduPersonAffiliation This is how the merge value key is combined with the attribute value key. |
merge Attribute values returned for multivalued attributes are combined with those from Azure AD. Duplicate values for attributes with the same name are deduped. For example, if the value for eduPersonAffiliation in Azure is “member”, and the value for eduPersonAffiliation in the Attribute Authority is “staff”, the assertion will be a multivalued attribute containing “member” and “staff” Results in Assertion Attribute Name: eduPersonAffiliation Attribute Value: memberstaff |
|
mode |
mode=overwrite, attributes=eduPersonAffiliation |
overwrite Attributes from the Attribute Authority are added to those in Azure AD. Attribute Authority attributes overwrite attributes with the same name as those from the Azure AD. For example, if the value for eduPersonAffiliation in Azure AD is “member”, and the value for eduPersonAffiliation in the Attribute Authority is “staff”, eduPersonAffiliation will have the value of only “staff”. Results in Assertion Attribute Name: eduPersonAffiliation Attribute Value: staff |
|
mode |
mode=preserve, attributes=eduPersonAffiliation |
preserve Attributes from the Attribute Authority are added unless they have the same name as those in Azure AD. If the attribute exists in both sources with the same name, the value from the attribute in Azure AD is preserved. In our example, the attribute eduPersonAffiliation from the Attribute Authority has the same name as the attribute in Azure AD. The attribute value, “staff”, for eduPersonAffiliation from the Attribute Authority is ignored. The attribute eduPersonAffiliation contains only the attribute value, “member”, from Azure AD. Results in Assertion Attribute Name: eduPersonAffiliation Attribute Value : member |
|
mode |
mode=replace, attributes=eduPersonAffiliation |
replace All attributes from the Azure AD environment are ignored. The attributes from the Attribute Authority replace them. |
Example of Cirrus Rules in Action Using Cirrus’ Azure AD Test Environment
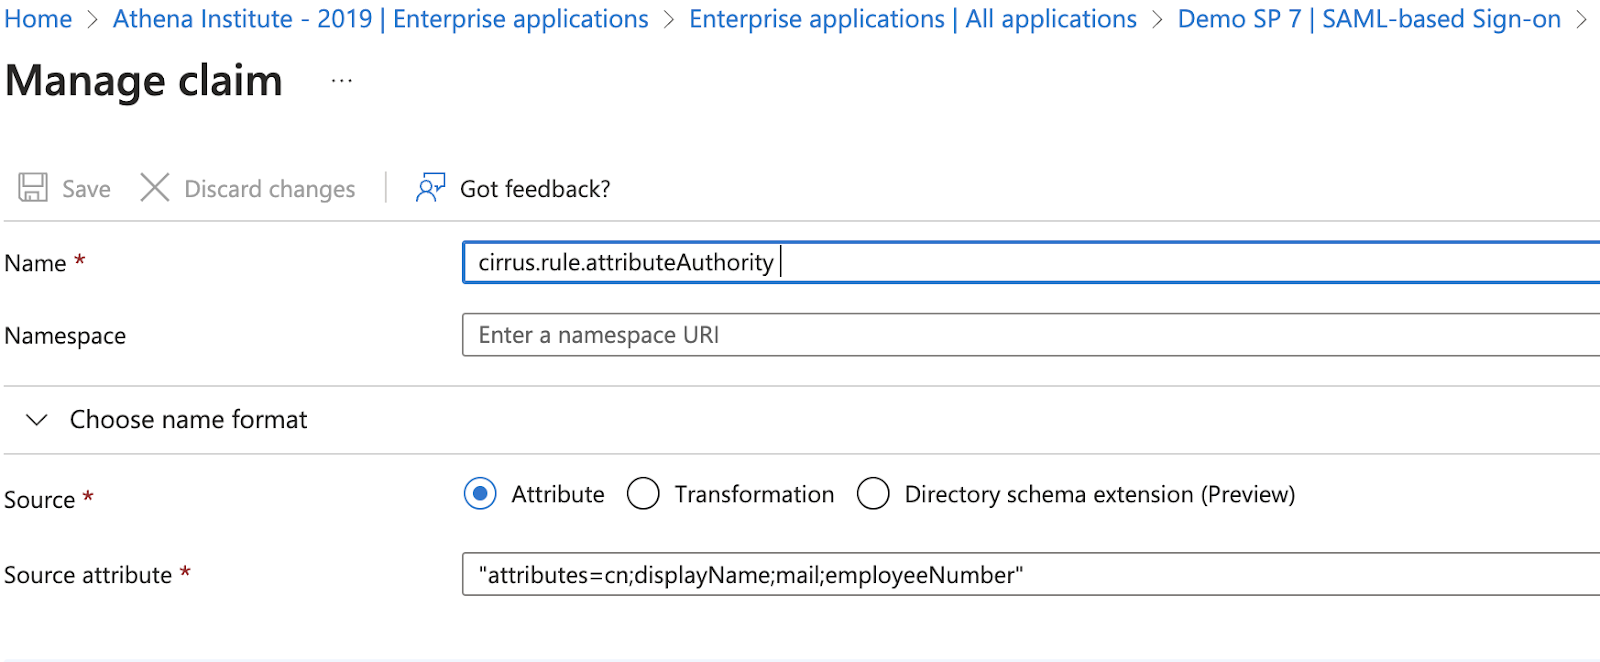
Below are the configured attributes for an enterprise application in Cirrus Identity’s Azure AD test environment.
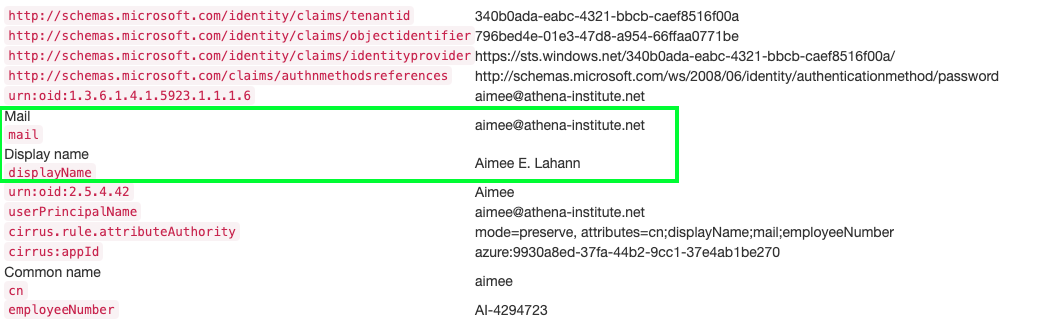
Here is the value of the attribute named cirrus.rule.attributeAuthority. This signals that attributes will be retrieved from a source outside the IdP.
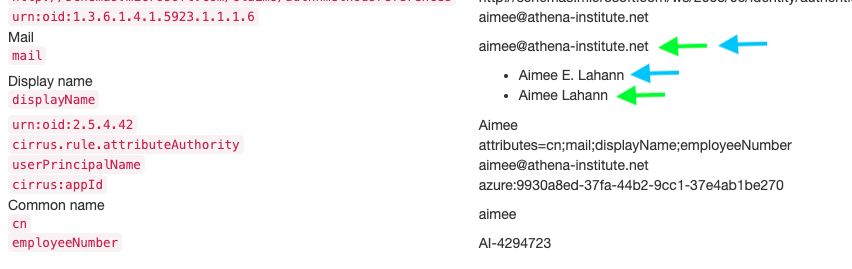
Note that displayName and mail are attributes that exist in the Azure AD environment and the Attribute Authority. Without specifying a mode to explicitly control the behavior of an attribute found in both sources, the default behavior is to merge the values and create a multivalued attribute.
For example, the attribute values marked with a green arrow are from the Attribute Authority, and those with a blue arrow are from the Azure AD environment. Note that the attribute named mail has only one value since it is the same in the Attribute Authority and Azure AD.
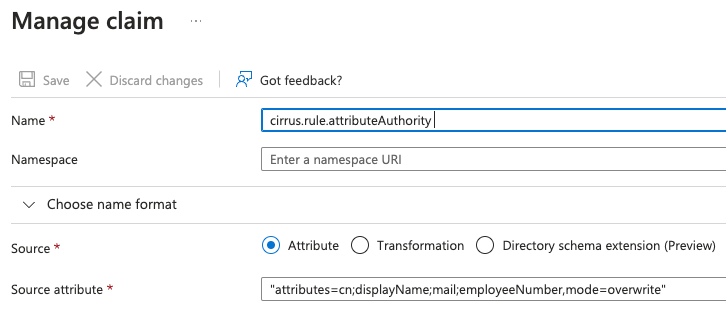
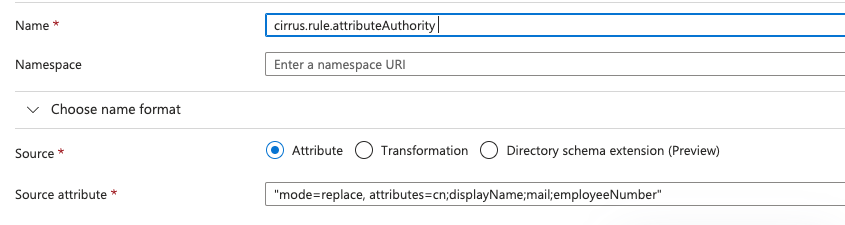
To overwrite the values for the attributes with the same name in Azure AD and Attribute Authority so that they only contain the values from the Attribute Authority, the Cirrus Rule looks like this:
Below is the resulting assertion. For the attributes with common names in both the Azure AD environment and the Attribute Authority, only the values from the Attribute Authority are asserted. However, the unique attributes and values from Azure AD and the Attribute Authority are retained.
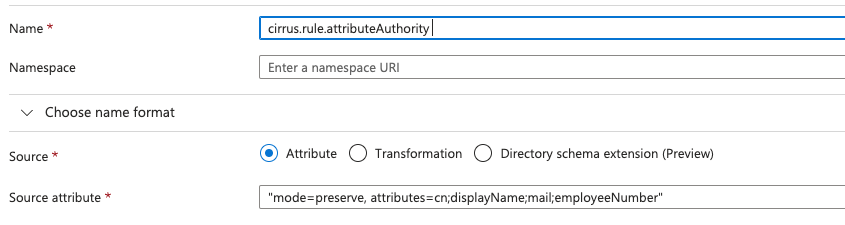
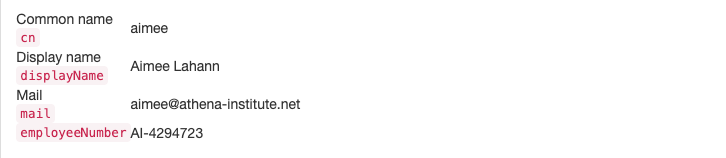
Instead, if I wanted to preserve the values of attributes in the Azure AD environment that have the same name as attributes from the Attribute Authority and also include the unique attributes from the Attribute Authority, the Cirrus Rule would look like this:
Attributes from the Attribute Authority are included if they are unique, like cn and employeeNumber. Values of attributes from the Attribute Authority with the same name as an attribute within Azure AD are ignored. The values for attributes mail and displayName are from Azure AD. See the resulting assertion below.
When you want to use attributes from the Attribute Authority and replace all the attributes from Azure AD in the assertion, the Cirrus Rule will look like this:
This is the resulting assertion. There are no values or attributes from the Azure AD environment.
Configuring Azure AD Custom Claims Provider with Cirrus Attribute Authority Add-On for Bridge
Here are the steps to configure Azure AD Custom Claims Provider to retrieve attributes from the Cirrus Attribute Authority for Bridge.
1. Authorize Cirrus to be a Custom Claims Provider.
You can authorize Cirrus to be a Custom Claims Provider by having an Azure admin visit this URL. $TENANT_ID should be replaced with your tenant ID.
2. Let Cirrus know you intend to use the Azure Custom Claims Provider so we can authorize your Azure AD tenant.
3. Add a Custom Claims Provider to your Azure tenant
a. Go to Enterprise Applications and click “Custom Claims Authentication” and then ‘+ Create a custom extension’
b. In the creation wizard
i. On the “Basic” tab, select the “TokenIssuanceStart” event
ii. In “Endpoint Configuration”
1. Name: “Cirrus Claims Provider”
2. Target URL: Will be of the form https://aa.cirrusidentity.com/azure/DOMAIN and will be provided by Cirrus once we’ve enabled the custom claims provider.
iii. On “API Authentication”
1. Select an existing app, and select “Cirrus Custom Claims Provider” with app id c1956276-dd2d-4ccf-9696-8d026797da66
a. If app is not listed, ensure you have visited the admin consent url
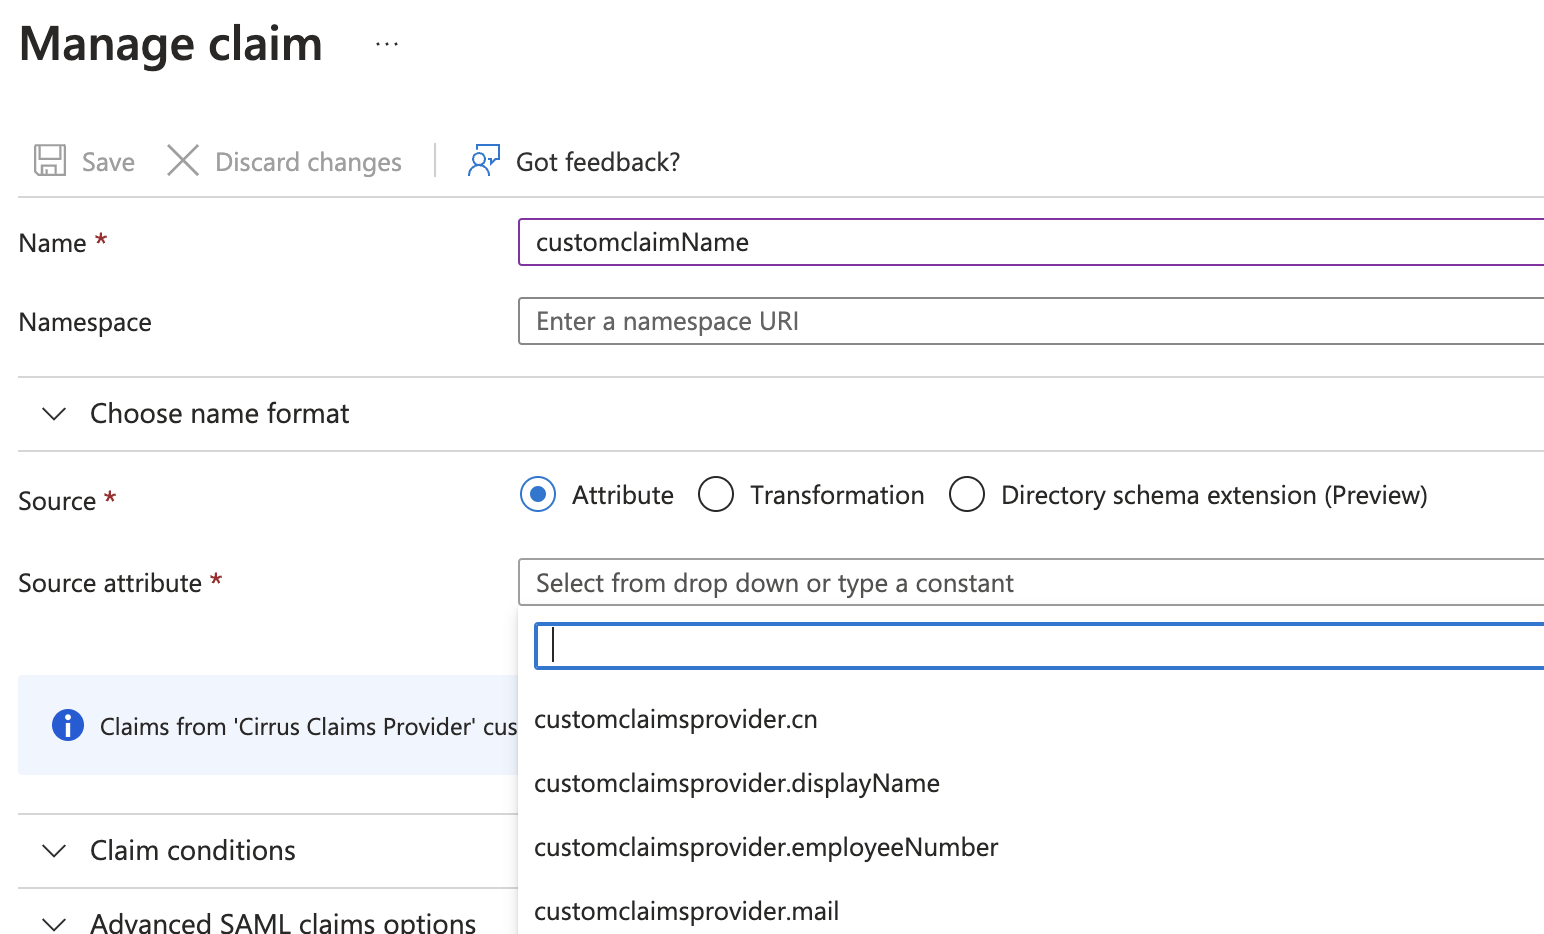
iv. On “Claims”
1. Available claims names will be provided by Cirrus. These are the names of attributes returned from Cirrus. These likely map to LDAP names, but can vary based on configuration and case sensitivity of data stores
v. Create the App
4. Next, enable the custom claim provider for a SAML App.
a. Go to the app where you normally configure attributes
b. Under “Advanced Settings” add the custom claims provider
c. Then “Add new claim” and you can select custom claims


Blog comments