


Overview Use this API documentation for:
Introduction
Customers that subscribe to the Cirrus Invitation, OrgBrandedID and/or Account Linking modules have additional functionality available to them through Cirrus Console. Please note that OrgBrandedID and Account Linking access is limited to Organization Administrators.
In this guide, you will be introduced to functions that exist within each module that allow administrators the ability to query users in the system, providing detail that can support business processes and/or troubleshooting as needed. Administrators may also leverage functionality to manage accounts at a high level.
It is worth noting the distinction between the different records that are maintained about end users in the Cirrus Suite. While they are often used together, each has a specific function. The following is a table of the records and the label that is used by Cirrus Identity for each one:
|
Label |
Description |
Purpose |
|
Invitation |
An email based request sent to an end user, either directly by a sponsor or via an API integration, to enable access to an application. |
To connect a specific end user (identified by access to an email mailbox) to one or more specific services, and optionally to designate a sponsor for this access. |
|
Guest |
The digital record resulting from an end user registering for access to one or more applications. |
To establish a digital record for an end user, either by successfully claiming an invitation using a method of login, or by linking a method of login with institutional data about the end user. |
|
Account |
A set of digital credentials associated with an end user, and validated by logging in. The credentials provided by an institution, provided by the Cirrus OrgBrandedID, or by social providers such as Google, Microsoft, and others are all examples of accounts. |
To resolve an end user and validate the end user for access to an application by the process of logging in (authenticating) with a known set of digital credentials. |
|
Linking Data |
A collection of attribute values associated with a login method and the end user’s relationship with the institution. |
To attach institutional data to an end user’s login method so that access to applications can be controlled. |
Manage Invitations
To manage invitations, you must first navigate to a service provider configured to use Cirrus Invitation - this will usually be your institution’s invitation proxy. This is located under Service Providers (My SPs) on your dashboard. Once selected, you will be presented with a navigation bar on the left-hand side of the Console. Please note that tables within the Guests tab and Pending Invitations tab are sortable by clicking on the column header.
Guests
In the guests tab you can search for and view the registration information for guest invitations that have completed the invitation claim process. On the overview, you will see the following items in addition to the ones of note that are annotated below:
- Name - the name of the guest with last name first
- ePPN - the unique identifier that corresponds to the guest
- Latest Sponsor - the most recent sponsor for the corresponding guest invitation
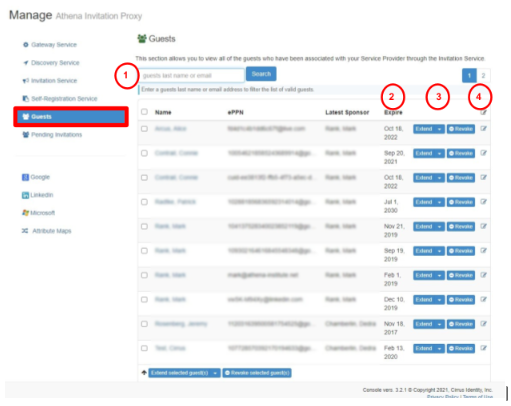
- Search Bar - you can search for guest using either their last name or email address
- Expire - this is the expiration date for the corresponding guest account
- Extend and Revoke buttons - using these buttons you can either extend a guest invitation (prior to expiration) or revoke access
- Edit - Clicking the Edit button will allow you to see more information about the guest account
View Guest Details
In this section you can view the registration information for a specific guest invitation.
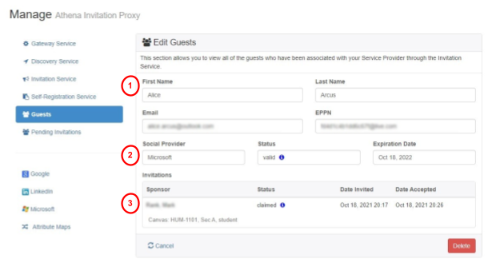
- Basic Information
- First Name: Guest first name
- Last Name: Guest last name
- Email: refers to the email address used to claim the guest invitation
- EPPN: refers to the unique identifier stored for the guest invitation
- Status: refers to the status of their guest invitation. Statuses include: invited, valid, and expired. Hover over the “i” icon for more information.
- Expiration Date: refers to the date in which the guest account will expire
- Social Provider - if the guest has linked their account with a social provider using the linking proxy, the social provider will be displayed here, otherwise this section will be empty
- Invitations - This section includes a guest’s invitation history
- Sponsor: Refers to the entity who invited the guest
- Status: refers to the status of the invitation. Hover over the “i” icon for more information.
- Date invited: refers to the date the invitation was sent
- Date Accepted: refers to the date the invitation was accepted
Pending Invitations
In this section you can view all invitations that have been sent but not yet claimed.
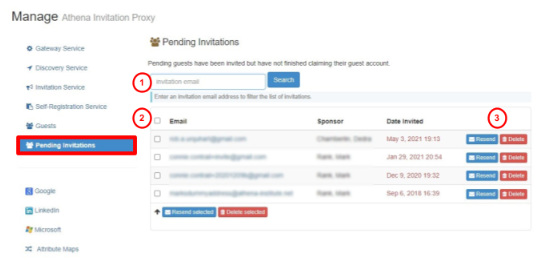
- Search Bar - here you can search for an invitation by the invitation email
- Info table - here is where the basic information for the invitation is displayed
- Email - refers to the invitation email
- Sponsor - refers to the Sponsor or entity who sent the invitation
- Date Invited - refers to the date which the invitation was sent
- Resend and Delete buttons - using these buttons you can resend an invitation to the corresponding email or delete an invitation
Manage OrgBrandedID Accounts
To manage OrgBrandedID accounts, you must first navigate to your institution’s Organization, which is located in the navigation bar at the top of the page under My Orgs. Once selected, you will be presented with a navigation bar on the left-hand side of the Console. Please note that OrgBrandedID data is listed under External ID Admin. Administrators may sort the data by columns by clicking on the header.
External ID Admin
In this tab, you can search for and view the registration information for organization branded ID Accounts. On the overview, you will see the following items in addition to the ones of note that are annotated below:
- Name - the name of the guest with last name first
- Username - the login credential (typically an email address)
- Created - the date of which the account was created
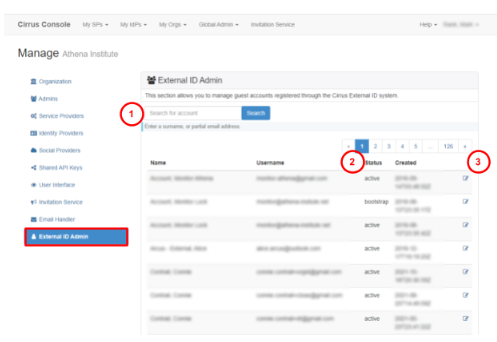
- Search Bar - you can search for guest using either their name or their username
- Status - The current state of the account. Statuses include: active and bootstrap--with bootstrapped referring to an account that has been invited but the claim process has not yet been completed.
- Edit - Clicking the Edit button will allow you to see more information about the guest account
View Guest Details
In this section you can view the registration information for a specific external account.
Basic Information
- Given Name: User’s first name
- Surname: User’s last name
- Email Address: refers to the email address associated with the account
- Mobile Phone: refers to the phone number associated with the account
- Status: refers to the status of the account. Statuses include: active and bootstrap--with bootstrapped referring to an account that has been invited but the claim process has not yet been completed.
Manage Account Linking Data
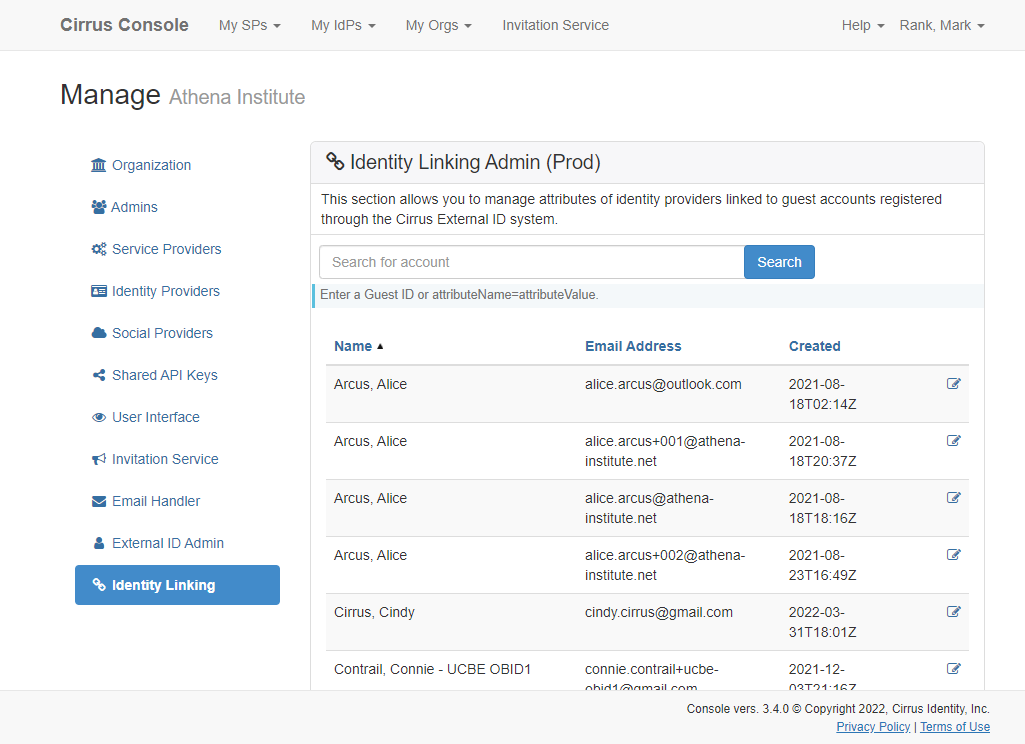
To manage account linking data, you must first navigate to your institution’s Organization, which is located in the navigation bar at the top of the page under My Orgs. Once selected, you will be presented with a navigation bar on the left-hand side of the Console. Select Identity Linking tab from the navigation. Like the tables within the Guests tab and Pending Invitations tab, the Identity Linking table is sortable by column by clicking on the header.
Linking Data
From the Identity Linking tab, you will select the Identity Linking Group. Every customer gets at least two linking groups: a Prod Linking Group and Test Linking Group. Linking refers to a group of service providers that use the same linking information and are assigned the same linking group. Linking groups align with the proxy (e.g. test and prod).
View Linking Data Details
Once you select a linking group, you will be able to manage attributes of identity providers linked to guest accounts registered through the Cirrus Extern ID (OrgBranded ID) system.
NOTE - There is currently no way to differentiate guests that have a linking record from guests that were invited via the Invitation Service. This is a known issue and will be enhanced in the future.
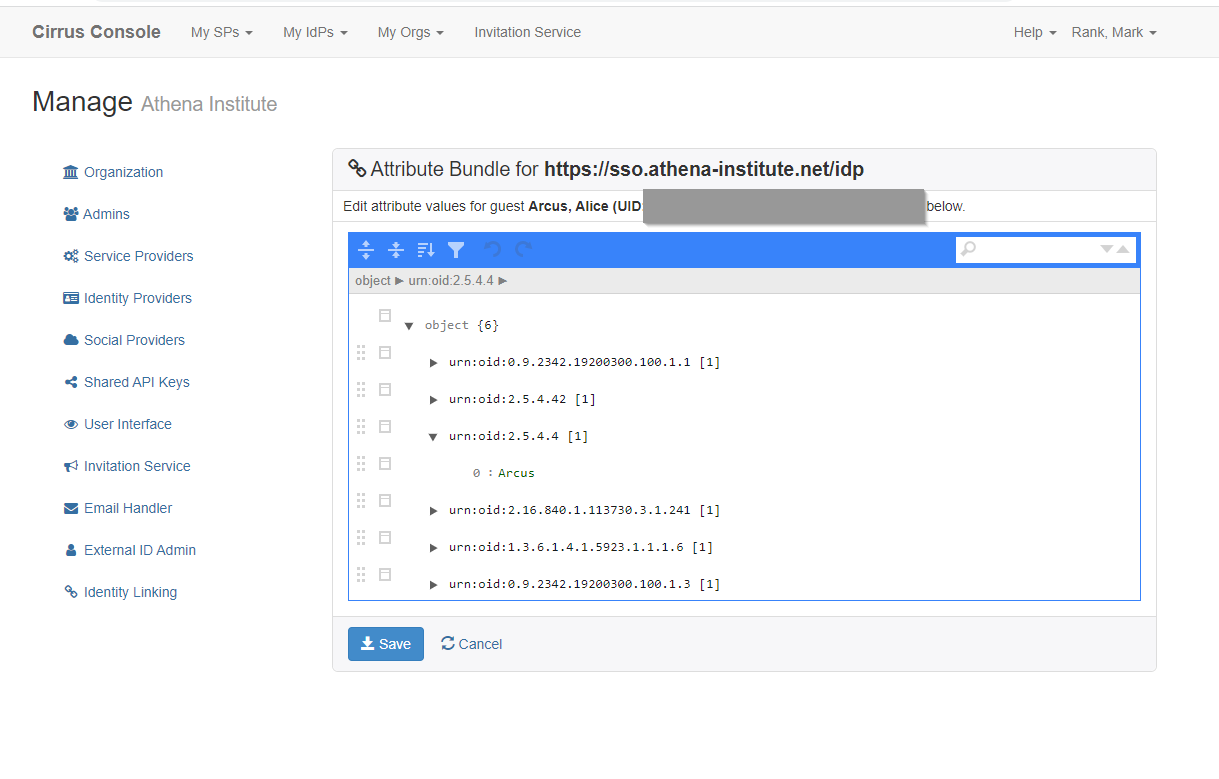
Manage Attributes
To modify or delete attribute bundles, select the parent record by clicking on the icon on the far right of the table. You will be able to drill down into the guest record.
Basic Information
- Guest UID: The guest account’s UID
- Link Group ID: The guest account’s linked Group ID.
- Given Name: First name of the account holder
- Surname: Last name of the account holder
- Email Address: Email address of the account holder
- Creation Time: The time the guest account was created
- Modification Time: The last time the guest account was modified
Administrators may see which attributes are assigned to the individual by selecting the identity provider. Users may also edit the attribute bundle.
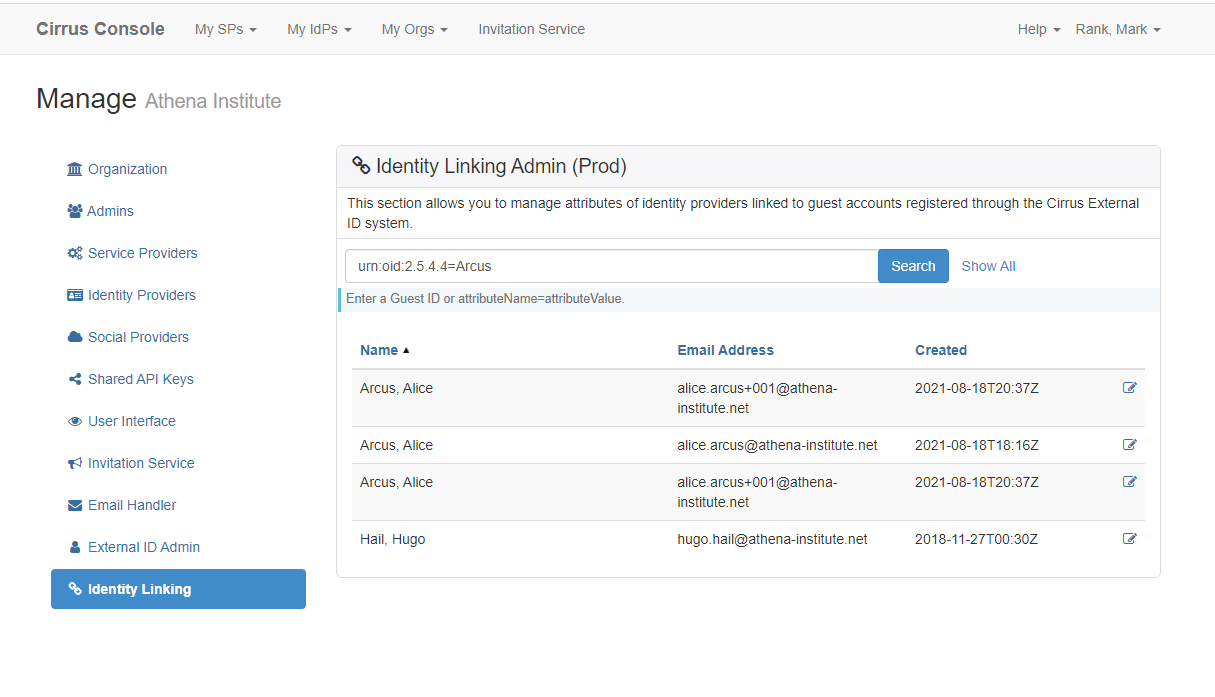
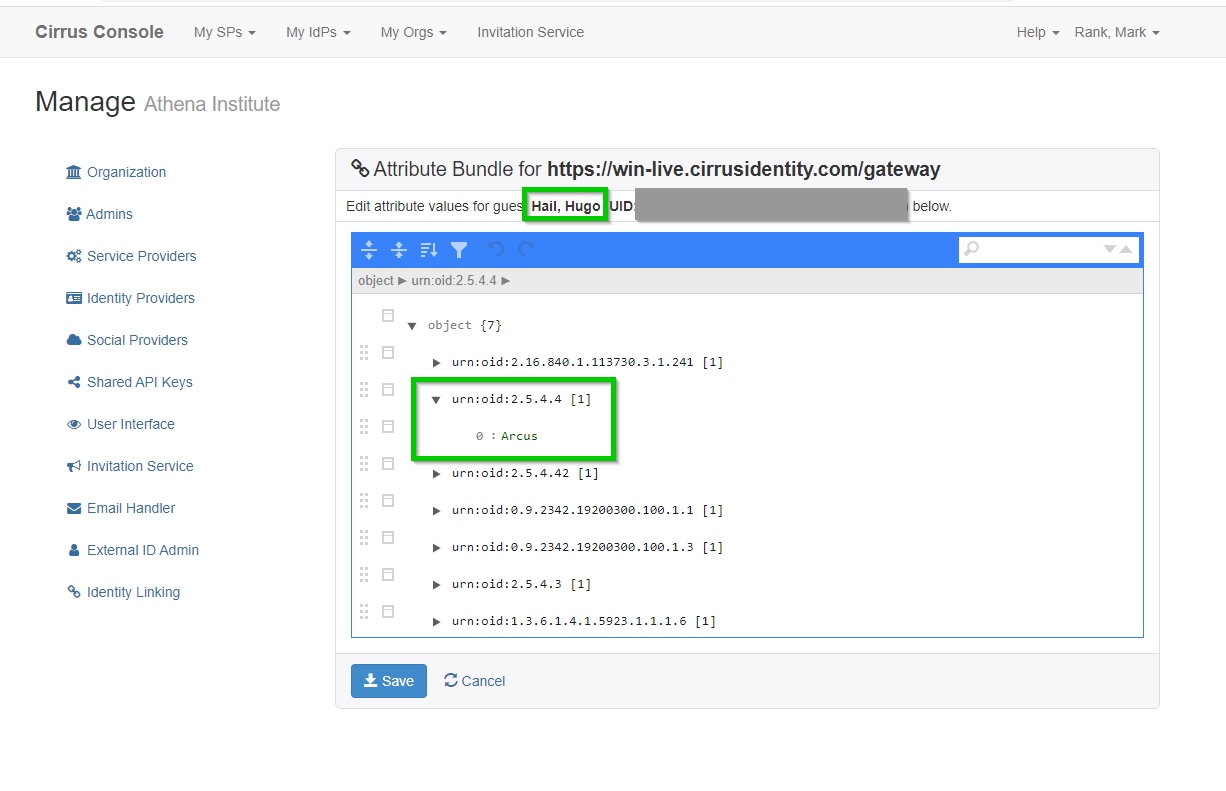
Search Functionality
At the main screen for Identity Linking, there is a search bar at the top of the page. You may search by either Guest ID or attribute name. This allows you to find the relationship between users. For example, you can find guests that are attached to another guest’s email account. In the example below, Hugo Hail is attached to Alice’s Outlook account.
© Copyright Cirrus Identity, Inc.
